
There’s something undeniably satisfying about walking into your own basement and being greeted by a beautiful, fully stocked bar you built with your own hands. A diy basement bar isn’t just a home improvement project — it’s an investment in unforgettable memories, a space where game nights turn legendary and dinner parties never want to end. If you’ve been dreaming about creating the ultimate entertainment corner beneath your home, you’re not alone. Millions of homeowners every year decide to build a bar in their basement, and for good reason.
The best part? You don’t need a contractor, a limitless budget, or even advanced carpentry skills. With the right plan, a weekend’s worth of effort, and this complete guide to building a basement bar, you’ll have a showstopper space that looks custom-built without the custom price tag. Whether you’re picturing a sleek modern wet bar, a rustic pub-style setup, or a simple mini bar in basement tucked into a corner, the process is more straightforward than you might think.
This guide walks you through everything — from planning and layout to choosing the right diy bar cabinets, selecting countertops, running electrical, and adding those finishing details that make guests say, “Did you really build this yourself?” Let’s get into it.
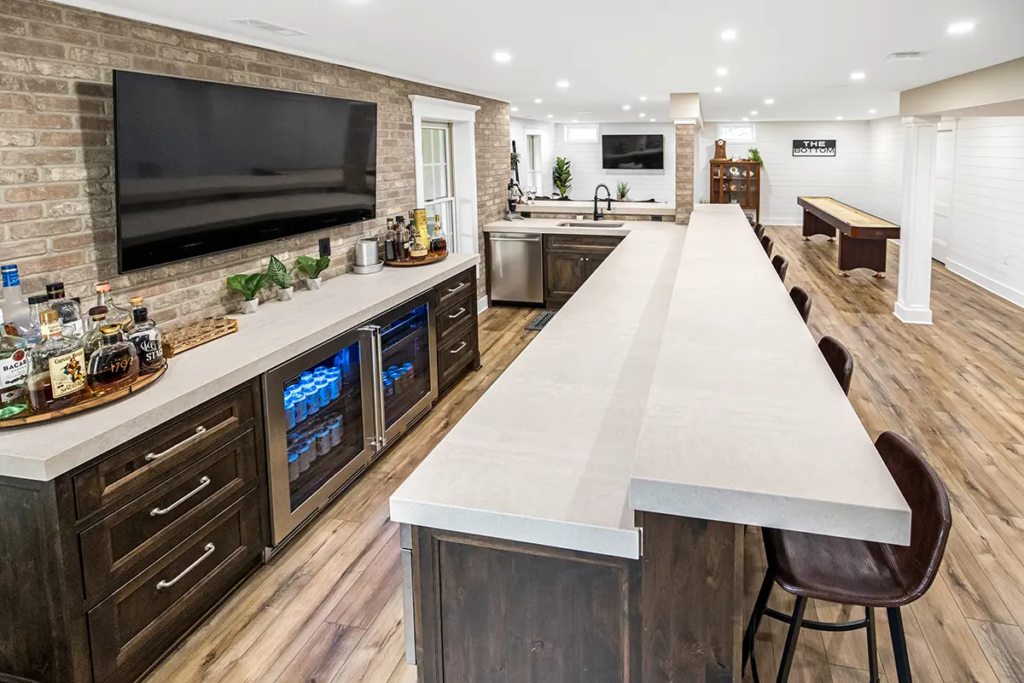
A fully finished DIY basement bar with custom wood cabinets, quartz countertop, and bar stool seating — proof that a dream bar is achievable on a DIY budget.
Planning Your DIY Basement Bar: The Foundation of a Great Build
Before you pick up a single tool, the smartest move is to sit down with graph paper or a free floor planning app and sketch out your vision. Great diy basement bars don’t happen by accident — they’re the result of intentional planning that accounts for space, traffic flow, plumbing, electrical needs, and personal style.
Measuring and Mapping Your Basement Space
Start by measuring your basement thoroughly. Note where existing plumbing, electrical panels, and load-bearing walls are located. The ideal spot to build a bar in basement is near an existing wall where you can route plumbing and electrical without a full gut renovation. A corner location is especially popular because it creates a natural “backbar” wall and maximizes visual impact without eating up the entire room.
Think about traffic flow, too. You’ll want enough room for bar stools on the guest side (typically 24 inches per seat), plus at least 36 inches behind the bar for the person serving. If you’re planning a basement bar with island, factor in clearance on all sides — 42 to 48 inches is ideal for comfortable movement.
Choosing Between a Wet Bar and a Dry Bar
One of the first decisions you’ll make when building a bar in basement is whether you want a wet bar or a diy dry bar. A wet bar includes a sink, which requires plumbing connections to your home’s water supply and drain line. A dry bar skips the plumbing entirely, making it dramatically easier to install and perfect for spaces where running pipes would be costly or disruptive.
📏 DIY Basement Bar — Key Measurements at a Glance
| Measurement | Value | Notes |
| Bar Counter Height | 42 inches | Standard bar height |
| Base Cabinet Height | 34–36 inches | Bar height base cabinets |
| Bartender Clearance | 36 inches | Behind bar minimum |
| Per Seat Width | 24 inches | Bar stool spacing |
| Average Bar Width | 8–12 feet | Most basement builds |
| Average DIY Cost | $1,500–$5,000 | vs $10K–20K+ for pros |
Drafting Your Basement Bar Blueprints
Even a basic sketch counts as basement bar blueprints. Draw the wall where your bar will sit, mark the bartop dimensions, indicate where cabinets go, and note electrical outlet locations. Standard home bar dimensions run about 8 to 12 feet wide, with a bar counter height of 42 inches (standard bar height cabinets sit at 34–36 inches, leaving room for a 6-inch countertop overhang). If you prefer a kitchen-style setup, drop-height counters work just as well and can double as a prep area.
How to Build a Bar in the Basement: Framing and Structure
Once your plan is finalized, it’s time to start building. How to build a bar in the basement starts with framing — the skeleton that supports your countertop, cabinet structure, and kneewalls. Proper framing ensures stability, especially if you ever lean on the bar (and let’s be honest, your guests absolutely will).
Building the Bar Frame with 2×4 Lumber
Most DIYers frame their basement bar build using standard 2×4 or 2×6 lumber. You’ll build a basic wall frame — a bottom plate, top plate, and vertical studs — to define the shape of your bar. The front of the bar (the kneewall) typically runs at your desired bar height minus the thickness of your countertop material. For a 42-inch finished bar with a 1.5-inch thick countertop, frame your kneewall to 40.5 inches.
Snap a chalk line on the floor where you want the front of the bar to sit, then frame accordingly. Use construction adhesive along the bottom plate to secure it to the concrete floor, and drive concrete screws every 16 inches for a solid connection.
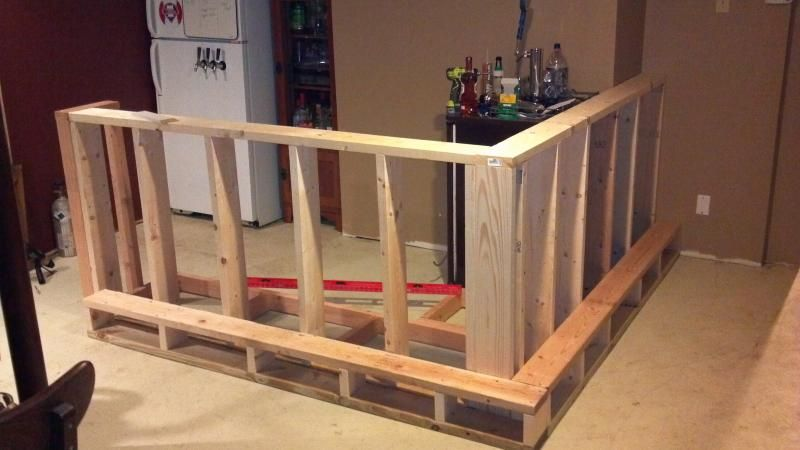
Framing the bar kneewall with 2×4 lumber — this is the skeleton of your entire build. Take time to get everything plumb and level before moving forward.
| ✔ Pro Tip Always check your framing for plumb and level before securing anything permanently. A bar that’s slightly off-level won’t just look wrong — it’ll make your glasses slide and your bottles roll. |
Kneewalls, Shelving Backer, and Backsplash Framing
The kneewall is the customer-facing side of your bar. Frame it solidly, then sheathe it in half-inch drywall or plywood before applying your finish material (beadboard, shiplap, tile, or stone veneer are all popular choices). For your basement bar wall, frame a separate back section that will support upper shelving or a built in bar wall display. This is where you’ll eventually install bar upper cabinets or open shelving for your bottle display.
Choosing and Installing DIY Bar Cabinets
Cabinets are the single biggest visual and functional element of any homemade basement bar. Get them right, and your bar will look professional and polished. Here’s everything you need to know about selecting and installing basement bar cabinets.
Using Kitchen Cabinets for a Bar Build
Standard kitchen base cabinets are 34.5 inches tall, which — when topped with a countertop — lands right at kitchen counter height. For a proper 42-inch bar height, use 42 bar height cabinets (available through specialty suppliers), or elevate standard kitchen cabinets on a raised platform. You can also use upper cabinets for bar shelving on the back wall. Standard wall cabinets (30 or 36 inches tall) mounted above the back counter make perfect bar wall cabinets for glassware, mixers, and display bottles. This approach is the most budget-friendly way to achieve a polished built in basement bar look without custom pricing.
How to Build a DIY Bar Cabinet from Scratch
If you’re handy with a table saw and router, building your own diy bar cabinet is surprisingly achievable. Learning how to build a bar cabinet involves a plywood carcass (¾-inch plywood is standard), a face frame made from poplar or oak, and shaker-style doors. Here’s the process for how to build bar cabinets:
- Cut your cabinet sides, top, bottom, and back from ¾-inch plywood using precise measurements.
- Assemble the box with wood glue and pocket screws (a Kreg jig makes this dramatically easier).
- Build and attach a face frame from 1×2 hardwood, flush with the front edges.
- Hang doors with concealed European-style hinges for clean, adjustable results.
- Sand, prime, and paint — or apply a wood finish if using hardwood plywood.
For those who prefer a shortcut, pre built bar for basement cabinet sets are available from RTA (ready-to-assemble) suppliers online. Brands like IKEA, Waypoint, and Kitchen Cabinet Kings all offer base cabinets for bar use that arrive flat-packed and assemble in an afternoon.
Bar Height Base Cabinets and Under-Bar Storage
Standard bar height base cabinets — also called bar height kitchen cabinets — are 42 inches tall, specifically designed for bar counter applications. Pair them with under bar cabinets for storing mixers, blenders, ice bins, or a trash can. When planning cabinets for basement bar use, think about what you’ll actually reach for most often and design your layout around that workflow.
DIY Bar Hutch and Upper Display Cabinets
A diy bar hutch — an upper cabinet unit that sits on top of or behind the bar counter — adds tremendous visual drama to any basement bar. You can build a bar cabinet hutch using plywood-and-face-frame construction, incorporating glass-front doors and interior lighting for a high-end look. A bar built into wall design — where shelving and cabinet structure are recessed into a framed cavity — is one of the most popular looks in modern basement bar design.

Dark-stained bar height base cabinets with open upper shelving create a polished, built-in look. Using matching kitchen cabinet lines keeps costs down without sacrificing style.
Countertop Options for Your DIY Basement Bar Counter
The diy bar counter surface is where function meets style. Here’s a breakdown of the most popular countertop materials for a basement bar build.
Butcher Block — The DIY Favorite
Butcher block countertops are a perennial favorite for anyone learning how to build a bar on a budget. They’re warm, forgiving to cut and sand, and genuinely beautiful. At $10 to $30 per square foot, they’re also one of the most affordable options. The downside: they require periodic sealing and aren’t fond of standing water.
Quartz and Granite — Premium Durability
Quartz is the gold standard for anyone serious about their build basement bar countertop. It’s non-porous (no sealing needed), extremely durable, resistant to stains and spills, and available in hundreds of colors and patterns. Both quartz and granite cost $40 to $100+ per square foot installed.
Concrete Countertops — Industrial and Custom
A poured-in-place concrete countertop is the ultimate diy bar show-stopper. You can embed bottle caps, stones, or colored glass for a completely unique look. Concrete does require sealing and occasional polishing, but the aesthetic payoff is unmatched. Total cost for a DIY concrete top runs around $5 to $15 per square foot in materials.
| ⚠ Watch Out Whatever countertop material you choose, always overhang the front edge by at least 8–10 inches to allow for comfortable bar stool seating. A countertop that doesn’t overhang enough is one of the most common and frustrating mistakes in how to build a bar in your basement. |
Designing the Back Bar: Built-In Bar Wall and Display Shelving
A well-designed built in bar wall — also called a back bar — is what separates a basic counter from a legitimate entertainment centerpiece. This is where your bottles, glassware, and bar tools live on display, and it’s the backdrop for every photo taken at your bar.
How to Build a Back Bar from Scratch
Learning how to build a back bar involves framing a wall-mounted shelf unit or a freestanding back bar cabinet at whatever height fits your space. Frame the shelves at varying heights — lower shelves for larger bottles, upper shelves for glassware — and consider adding LED strip lighting behind a valance board for dramatic backlit bottle display.
For a diy wall bar that’s truly built in, frame a shallow 12-to-18-inch-deep niche into your basement wall using 2×4 lumber. Sheathe the interior with drywall, tile, or a decorative panel, add floating shelves, and you’ve got a bar built in cabinets look that appears to cost thousands more than it actually does.
DIY Bar Wall Designs and Finishing Ideas
Some of the most impressive diy bar wall designs use contrast and texture to create visual interest. Popular approaches for your basement wall bar:
- Shiplap accent wall — painted in deep navy or charcoal for a moody, modern look behind the diy home bar cabinet display.
- Reclaimed wood panels — adds warmth and authenticity to a rustic pub-style diy basement bar.
- Subway tile — timeless, easy to clean, and perfect for wet bar backsplashes.
- Stone veneer — gives a dramatic, high-end look especially when combined with warm Edison bulb lighting.
- Mirrored panels — the classic bar back finish, creating depth and making bottles look twice as impressive.
Electrical, Lighting, and Bar Installation Essentials
No bar installation is complete without proper electrical planning. Plan on installing at least 2 to 3 dedicated 20-amp circuits for your bar area, and consult a licensed electrician if you’re not confident with electrical work.
Lighting That Sets the Mood
A layered lighting plan transforms a simple counter into an experience. Consider:
- Pendant lights over the bar counter for task lighting and visual anchoring.
- Recessed can lights in the ceiling for general ambient light (dimmer switches are a must).
- LED strip lighting inside back bar shelves or toe kicks for a dramatic glow effect.
- Under-cabinet lighting on your bar base cabinet uppers for a clean, professional look.
For a simple diy basement bar, even just one statement pendant fixture over the bar counter and some LED strips behind the bottle display will make an enormous difference in how the finished space feels.
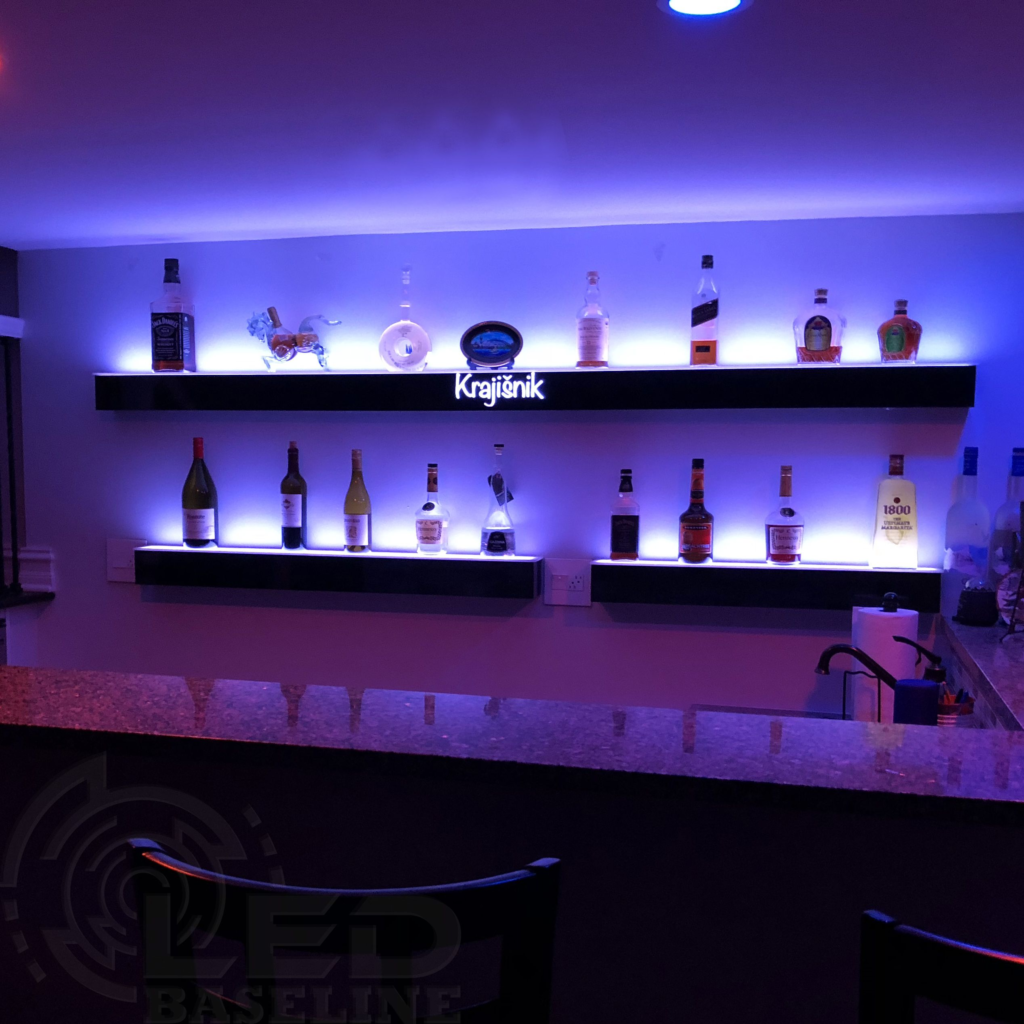
LED-backlit bottle shelves on the back bar wall are the single most dramatic upgrade you can add to any basement bar build — and they cost less than $50 in strip lighting.
How to Build a Basement Bar: Step-by-Step Summary
Here’s the full how to build a basement bar process in sequential order. Use this as your master checklist for your build your own basement bar project.
| STEP 01 Plan & Design Measure your space, draw basement bar blueprints, decide on wet vs. dry bar, and finalize your layout. | STEP 02 Rough-In Plumbing & Electrical Run water lines, drain lines (wet bar), and electrical circuits before closing any walls. |
| STEP 03 Frame the Bar Structure Build your kneewall, back bar frame, and any partition walls using 2×4 lumber. | STEP 04 Install Drywall & Backer Sheathe all framing. Use cement board in wet areas behind any sink or tile application. |
| STEP 05 Install Base Cabinets Set and level your bar base cabinets, shimming as needed and securing to wall studs. | STEP 06 Install Upper Cabinets & Shelving Mount bar upper cabinets and back bar shelving. Add interior lighting before sealing. |
| STEP 07 Install the Countertop Set your countertop material, cut the sink opening if needed, and apply appropriate sealers. | STEP 08 Finish & Detail Install hardware, trim, lighting fixtures, apply final paint, and stock your bar. Done! |
What Does a DIY Bar for Basement Cost? Real Budget Breakdown
One of the most common questions people have before they make a bar in their basement is: how much is this going to cost? Here’s a realistic breakdown for a typical 10-foot build your own bar project.
Budget-Level DIY Basement Bar ($1,200–$2,500)
A budget build typically uses RTA stock kitchen cabinets, butcher block or laminate countertops, basic pendant lighting, and simple painted drywall on the bar front. No sink, but a mini-fridge fits perfectly. This is the ideal approach for a diy bar basement in a rental or a space where you want to minimize investment while maximizing fun.
Mid-Range Build ($2,500–$5,000)
A mid-range basement bar diy project adds a sink with plumbing, quartz or granite countertops, semi-custom cabinets (or well-built DIY cabinets), a built-in back bar with lighting, and professional-grade lighting fixtures. This is the sweet spot where most serious DIYers land.
High-End Custom Look ($5,000–$8,000+)
At this level, you’re looking at custom-built diy built in bar cabinet systems, premium stone or concrete countertops, a full back bar with mirrored panels and specialty lighting, a dedicated beer tap system, and high-end appliances. This is still far below what a contractor would charge ($15,000–$30,000 for the same result), making the diy bar in basement approach incredibly cost-effective.
| 💡 Save Money Tip Search online marketplaces for used basement bars for sale or salvage kitchen cabinets from renovation projects. You can often source beautiful solid-wood cabinet sets for a fraction of new cost, then refinish them to match your vision exactly. |
DIY Bar Designs: Style Inspiration for Every Taste
One of the joys of building your own bar is that your personal style leads the design. Here are the most popular diy bar designs homeowners are building today.
The Modern Sports Bar
Dark-stained diy bar cabinets, a concrete or quartz countertop, and pendant industrial lighting give this style its sharp, contemporary edge. A basement bar wall with mounted TVs on either side of a backlit bottle display is the signature look. Add a few beer tap handles and some black metal bar stools, and you’ve got a build your own basement bar that rivals any sports pub in town.
The Rustic Farmhouse Bar
Reclaimed wood, white shiplap, butcher block countertops, and open shelving define this beloved style. A diy home bar cabinet with a distressed finish fits perfectly in this aesthetic. This style works especially well in basements with exposed brick walls, which can become a stunning accent behind your diy bar counter.
The Sleek Mid-Century Lounge
Clean lines, walnut-toned cabinetry, brass hardware, and a back bar with geometric tile make this style timeless. A diy built in bar in this style often features a curved or angled bartop edge and globe-style pendant lighting.
The Kitchen Bar Extension
If your basement opens adjacent to a kitchenette, a diy kitchen bar setup — using matching kitchen bar wall cabinets and kitchen cabinets bar design elements — creates seamless continuity. A how to build a kitchen bar approach lets you treat the bar as an extension of a full kitchen layout, complete with a prep area and bar base cabinet storage for cookware and barware alike.
Common DIY Basement Bar Mistakes (And How to Avoid Them)
Not Planning for Ventilation
A basement bar produces humidity and can develop musty odors if air circulation isn’t addressed. Plan for a ventilation fan or ensure your HVAC system reaches the basement bar diy area. This is especially important when building basement bar in a space with limited windows.
Skipping the Waterproofing Step
Basement floors and walls can be damp. Before you build bar in basement, apply a waterproof paint or membrane to concrete walls and floors in the bar area. Moisture seeping into basement bar cabinets will warp and destroy them over time.
Underestimating Electrical Needs
New DIYers consistently underestimate how many outlets a functioning bar requires. Between the mini-fridge, ice maker, blender, lighting, TV, and phone chargers, you’ll be grateful for every extra outlet during bar installation. Install more than you think you need.
Forgetting Bar Hardware and the Finishing Details
The gap between a finished-looking bar and a “work in progress” is often just hardware — door pulls, drawer handles, towel rings, bottle openers, and glass racks. Budget time and money for these details. They add polish to your diy basement bar that guests notice immediately.
✔ Quick Checklist Before Calling It Done:
- Level all cabinets before securing permanently
- Seal concrete floors before laying any flooring material
- Use waterproof caulk around all sink and plumbing penetrations
- Install a GFCI outlet for any outlets near the sink
- Apply two coats of primer to all MDF cabinet edges
- Pre-drill hardware holes before hanging cabinet doors
- Add adjustable shelf pins inside cabinets for flexibility
Frequently Asked Questions
How long does it take to build a DIY basement bar?
For a moderately sized diy basement bar, most DIYers complete the project over 3 to 6 weekends (roughly 40 to 80 hours of work). Simple builds with pre-assembled cabinets can be done in a single long weekend, while more complex builds with custom cabinets, plumbing, and tile work may take several weeks of part-time effort.
Do I need a permit to build a bar in my basement?
Permit requirements vary by location. Structural changes, electrical work (adding new circuits), and plumbing (adding a sink drain to the main line) typically require permits. Check with your local building department before you begin your basement bar build. Many cosmetic builds — cabinets, countertops, and no new plumbing or electrical circuits — don’t require permits at all.
What are bar height cabinets and do I need them?
Bar height cabinets are base cabinets built to 42 inches tall — the correct height for a traditional bar counter. You can either purchase true bar height base cabinets, raise standard cabinets on a built-up platform, or build a taller framed structure under a standard countertop to achieve the right height.
Can I build a bar in my basement without plumbing?
Absolutely. A diy dry bar is fully functional without any plumbing. Add a mini-fridge for chilled drinks, a large ice bucket or tabletop ice maker, and a utility bucket under the bar for dumping ice. Millions of homeowners build a basement bar without plumbing and entertain at the highest level.
What kind of wood is best for building bar cabinets?
For painted cabinets, MDF or paint-grade poplar are the most common choices. For stained or natural-finish diy bar cabinets, use hardwood plywood (oak, maple, or birch) for the cabinet boxes and solid hardwood for face frames and doors. Avoid particle board in basement environments — it swells and crumbles with any moisture exposure.
How do I make a small basement bar look bigger?
Several tricks help a mini bar in basement punch above its weight visually. Mount a large mirror on the back bar wall to double the apparent depth of the space. Use light cabinet colors with glass-front upper doors to keep things airy. Install vertical tile or shiplap on the wall behind the bar to draw the eye upward.
What is the best countertop material for a home bar?
Quartz is generally the best all-around countertop material for a diy bar counter because it’s non-porous, extremely hard, and requires zero sealing. Butcher block is a fantastic budget alternative with warmth and character. Granite is durable but requires periodic sealing. Concrete is the most customizable option if you’re willing to do the extra maintenance work.
Is a DIY basement bar a good investment for home resale value?
A well-built built in basement bar can meaningfully increase your home’s appeal to buyers and improve resale value. Estimates suggest a finished basement (including a bar) can return 70–75 cents on the dollar in resale value. The key is keeping build quality high and style relatively neutral so it appeals to a wide range of buyers.
Final Thoughts: Your Basement Bar Is Closer Than You Think
Building a diy basement bar is one of those home improvement projects that genuinely changes how you live in your home. It creates a dedicated space for connection — the kind of place where people linger, conversations flow freely, and ordinary Tuesday nights suddenly feel like something worth remembering.
The project can seem overwhelming at first glance, but broken into its components — planning, framing, cabinets, countertops, lighting, and finishing — it’s entirely manageable for any motivated homeowner. Whether you’re going all-in on a built in basement bar with custom cabinetry and a back bar display, or keeping it simple with a few base cabinets and a beautiful slab of butcher block, the process is fundamentally the same.
Every pro tip in this guide — from choosing bar height base cabinets to building a diy bar hutch, from waterproofing your floor to choosing the right countertop material — is designed to help you avoid the mistakes that slow most builds down and cost the most money to fix. With this guide in hand, you have everything you need to build your own bar cabinet system, frame a beautiful structure, and create a space that will pay dividends in joy for decades to come.
Now close this tab, open your basement door, and go build something worth drinking to.