

A bearded iris can look like a million-dollar flower and still cost less than a take-out lunch. The catch is that most failures happen in the first hour, when the rhizome goes into the ground a little too deep or a little too wet.
Get that hour right, and the plant mostly looks after itself. Get it wrong, and you get a clump of healthy leaves that never flowers, or a mushy rhizome that smells like something died.
This guide walks through the whole cycle: what you are actually buying, which class suits your yard, when to plant, how deep, how to divide, and how to read the warning signs before a small problem becomes a lost bed.
The numbers come from university extension services and the American Iris Society. Where something is general gardening practice rather than a sourced figure, I say so.
What You Are Actually Growing
The “beard” is the fuzzy line of hairs on each of the three lower petals, called falls. The three upright petals above them are the standards. Together they give the flower its familiar two-tier shape.
The part that matters for care is below ground. A bearded iris grows from a rhizome, a thick, horizontal stem that stores energy and sends up leaf fans and flower stalks.
That rhizome is why these plants behave differently from tulips or daylilies. It wants to sit at the surface, bake a little in the sun, and stay dry between rains. Treat it like a bulb and bury it, and it sulks or rots.
Roots grow down from the rhizome and anchor it. The leaves form a flat fan of stiff, sword-shaped blades, which is the quickest way to tell an iris from a clump of grass when the plant isn’t in flower.
Each rhizome blooms once from a given fan, then the plant grows new fans off the side. Those new fans carry next year’s flowers. That is why a clump spreads outward over time and why the center eventually goes quiet.
The Six Classes and When They Bloom
The American Iris Society sorts bearded irises mainly by height, and height tracks bloom order. The shortest flower first and the tallest flower last, which means you can stretch the show across several weeks by mixing classes.
| Class | Height | Bloom timing |
|---|---|---|
| Miniature Dwarf Bearded (MDB) | Up to 8 in (20 cm) | Earliest of the bearded irises |
| Standard Dwarf Bearded (SDB) | 8–16 in (20–41 cm) | Starts as MDBs finish |
| Intermediate Bearded (IB) | 16–27½ in (41–70 cm) | Overlaps SDB and TB |
| Border Bearded (BB) | 16–27½ in (41–70 cm) | With the tall bearded |
| Miniature Tall Bearded (MTB) | 16–27½ in (41–70 cm) | Varies by cultivar |
| Tall Bearded (TB) | 27½ in (70 cm) and up | Main late-spring display |
Source: American Iris Society classification. Exact bloom dates shift with climate, so treat the order as reliable and the calendar dates as local.
Most bearded iris rhizomes at garden centers are tall types, because those are the showy ones. If you only ever plant TBs, you get one big burst. If you add a few dwarfs at the front, the bed starts earlier and looks finished sooner.
Choosing a Bearded Iris for Your Yard
Start with wind and exposure, not color. Tall bearded stalks can top 30 inches and will flop in a gusty corner after a heavy rain. Border and intermediate types are shorter and sturdier, which is why they suit exposed beds and narrow front-yard strips.
Then think about the bed’s neighbors. Iris foliage is a clean vertical blade that looks good after the bloom is over, but the flowers last only a couple of weeks. Plan companions that take over in early summer so the bed doesn’t go flat.
Color is a matter of taste, but a few practical points help. Deep purples and blues read well against light siding and stone. Whites and creams glow at dusk. Warm oranges and rusts need a dark background, or they look washed out in strong afternoon light.
Some cultivars are sold as reblooming, sometimes labeled remontant, meaning they can flower again later in the season. Results depend heavily on climate and care, so read the grower’s notes for your region before paying a premium.
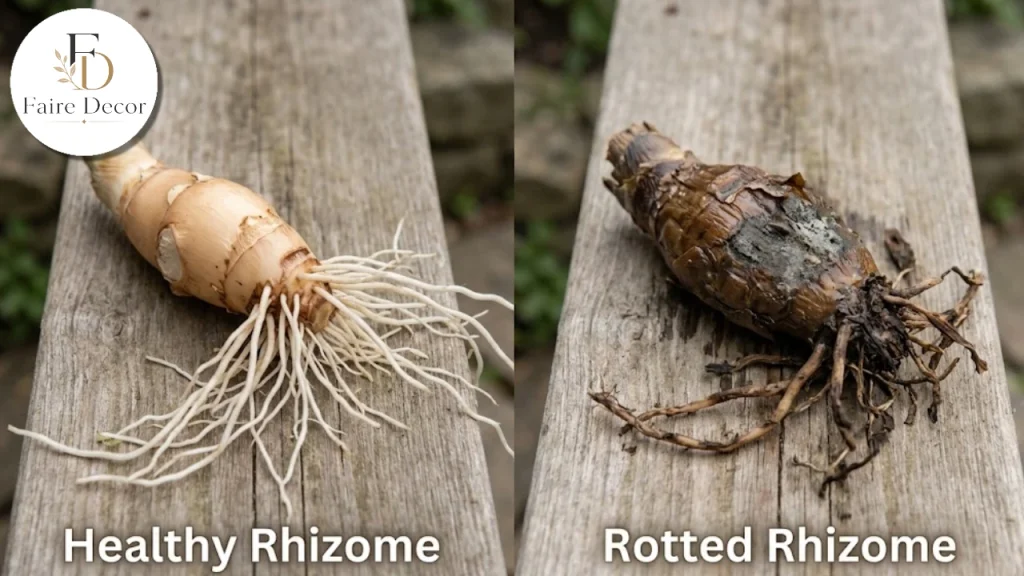
When you buy, inspect the rhizome like produce. Extension guidance from Illinois Extension describes a good division as firm and light colored, at least 3 inches long, about as thick as a thumb, with healthy roots and four to five leaves.
Walk away from anything soft, shriveled to a husk, or smelling sour. A rhizome that looks like a tired potato is not a bargain, whatever the label says.
Bare-root rhizomes from specialty growers usually ship in late summer, which lines up with the best planting window. Potted plants from a nursery can go in during the season, but they cost more and are often planted too deep from the start. Check the crown when you unpot it.
The Best Time to Plant or Divide
For most climates, the answer is late summer. Illinois Extension says July and August are the best time to divide, and that division is possible any time after bloom finishes.
Clemson Cooperative Extension gives a slightly different frame that is easier to use in a warm climate: divide six to eight weeks after blooming, from July through September, and no later than six weeks before the first frost.
That last rule is the one people forget. A new division needs time to anchor its roots before the ground freezes. Plant too late and frost heaving can push the rhizome right out of the soil.
If a rhizome arrives in the mail in October, you can still plant it, but mark the spot and check after hard freezes. Press any lifted rhizome back down and cover the roots, leaving the top exposed.
Sun, Soil and Drainage
A bearded iris wants the sunniest spot you have. Illinois Extension recommends at least six to eight hours of direct sun a day. Less than that and you get leaves without flowers.
Drainage matters more than soil richness. Bearded irises prefer well-drained ground, and wet soil is the fast road to rot. If water pools anywhere after rain, either move the bed or build it up.
A raised bed or a gentle mound solves most drainage problems. Eight to twelve inches of lift is plenty. This is general practice rather than a sourced number, but the principle is the same one extension sources stress: keep the rhizome from sitting in wet soil.
UConn Extension lists an optimum soil pH of 6.5 to 7 for bearded types. A cheap soil test tells you where you stand, and lime is the usual fix if you are on the acidic side.
Heavy clay and sandy soil each need a different planting depth, and this is where many guides go vague. Clemson’s advice is that in clay the rhizome should sit just above ground level on a cone of soil, while in sandy soil the top can sit up to half an inch below the surface.
One thing to leave out: mulch. UConn is blunt about it, saying not to mulch bearded irises because it may encourage the rhizomes to rot. That surprises people who mulch everything, and it is a common cause of unexplained losses.
Give the bed air, too. Crowded plants and walled-in corners hold humidity on the leaves, which invites the leaf spot covered later. Spacing and sun do more for disease prevention than any spray.
How to Plant a Bearded Iris, Step by Step
Here is the planting sequence for a bearded iris that extension sources agree on, with the numbers attached.
Prepare the bed. Loosen the soil and work in organic matter if it is heavy. Remove weeds and old iris debris.
Soak the rhizome. UConn suggests soaking bearded rhizomes for a few hours before planting, then watering right after planting.
Trim the leaves. Cut the fan back to about one-third of its height so the plant doesn’t tip over or lose water faster than the roots can supply it.
Dig the hole. Make it about four inches deep, with a small mound of soil in the middle. This follows Illinois Extension.
Set the rhizome on the mound. Spread the roots down both sides like a saddle.
Cover the roots, not the rhizome. The rhizome should end up barely showing, or just slightly exposed. Adjust for clay or sand as above.
Face the fans the same way. All leaf fans should point in one direction, so new growth has room to spread.
Space them. Plant 12 to 18 inches apart. Illinois Extension suggests clusters of three to seven rhizomes for a fuller look.
Water in, then back off. Soak once after planting, and then let the ground dry between waterings.
Clemson notes that closer spacing gives fuller displays sooner but means dividing sooner. If you want an instant look and don’t mind the extra work in three years, plant on the tight side.
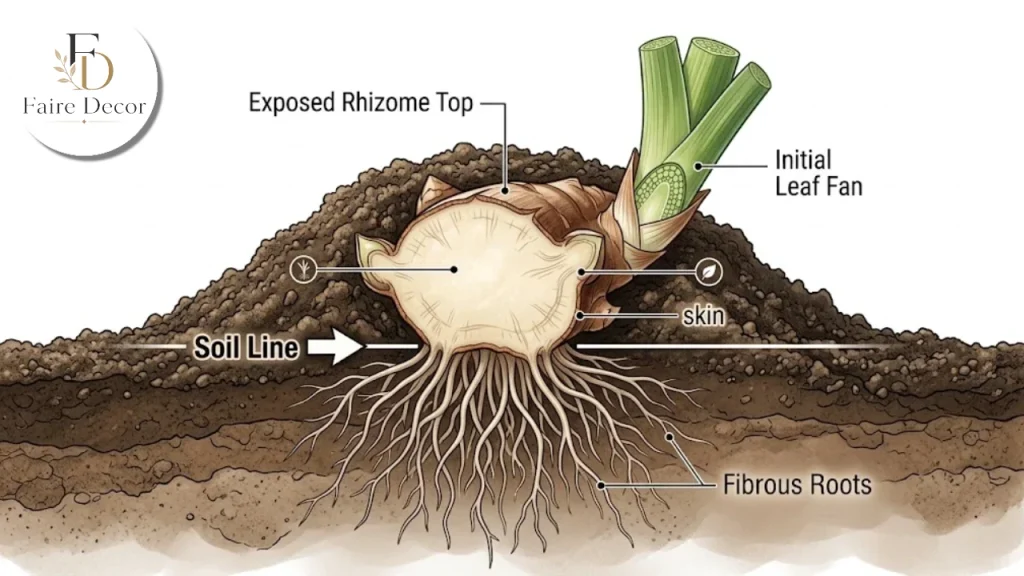
The single most common planting error is depth. A rhizome buried under two inches of soil may leaf out beautifully and never bloom. If a plant has good foliage but no flowers, dig it up in late summer and check how deep the rhizome sits.
The second most common error is wet feet. If you plant in a low spot, you are betting against the rain.
How and When to Divide a Clump
A healthy bearded iris multiplies until the center of the clump crowds itself out. Clemson lists the signs: the clump outgrows its space, growth slows, and flowers become few or none.
UConn says failure to bloom is usually a symptom of overcrowding, particularly when it shows in the center of the clump. Illinois Extension suggests dividing every three to five years, and UConn recommends every three to four, so a three-to-four-year rhythm is a safe working rule.
Here is how to divide, following Illinois Extension:
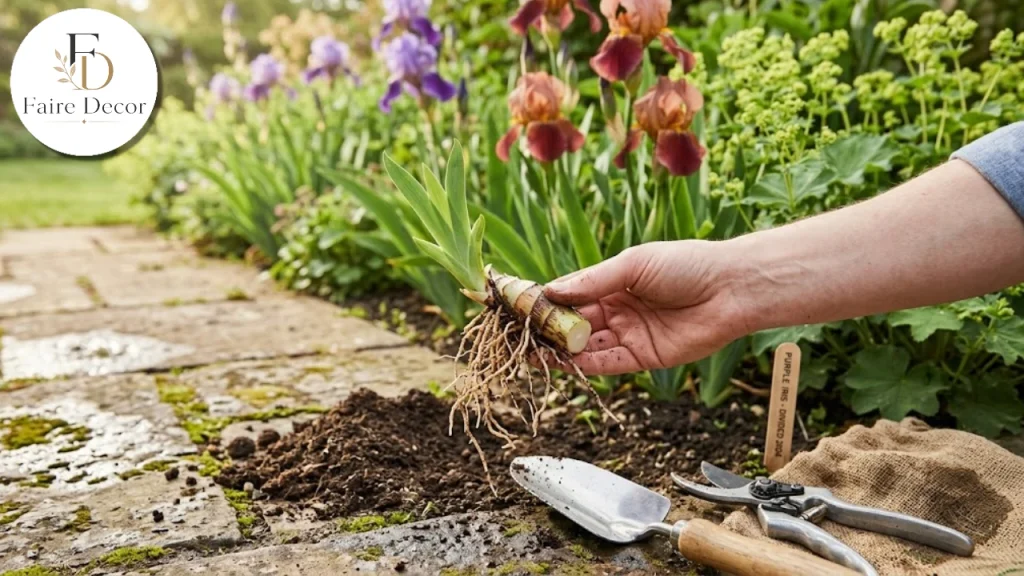
Lift the whole clump with a spade or digging fork, working outward from the edge so you don’t spear the rhizomes.
Shake off the soil and cut the leaves back to about a third of their height.
Sanitize your knife or pruners with a ten percent bleach solution or disinfecting wipes, and re-sanitize between cuts if you see any rot.
Break or cut the rhizomes apart. Each piece needs a leaf fan and healthy roots.
Keep the best pieces. Firm, light colored, at least three inches long, about as thick as your thumb, with four to five leaves.
Discard the rest. That means the old woody center, anything with borer damage, anything that smells foul, and anything mushy.
Don’t compost diseased pieces if your pile doesn’t get hot. Bag them or burn them where burning is allowed.
A tip that comes up often in garden practice: let cut surfaces dry in the shade for a few hours before replanting. This is common advice rather than a sourced figure, and it fits the logic of keeping fresh wounds out of wet soil.
Extra healthy divisions make good gifts, and iris swaps among gardeners are a long tradition. Label with color and class so the recipient knows what to expect.
Feeding, Watering and the Seasonal Routine
Bearded irises are not hungry. UConn advises fertilizing lightly with a low-nitrogen fertilizer such as 5-10-5, 5-10-10, or 6-24-24 in fall, scattered around the plant and kept off the rhizome.
Too much nitrogen makes lush leaves and fewer flowers, and it can make rhizomes more prone to rot. If your irises look big and green and never bloom, check your fertilizer before you blame the weather.
Watering is simple once the plant is established. Soak thoroughly when the weather turns dry for weeks, and otherwise leave it alone. Water at the base so leaves stay dry.
| Season | Task |
|---|---|
| Early spring | Clear old leaves and debris before the last frost, which helps remove overwintered borer eggs |
| Late spring | Enjoy the bloom, and snap off spent flowers as they fade |
| After bloom | Cut stalks down to where they emerge from the leaves and remove seed pods |
| July to September | Divide and transplant; plant new rhizomes |
| Fall | Light low-nitrogen feeding; after a killing frost cut foliage to 1 to 2 inches and clear all debris |
The fall cleanup and the early-spring cleanup are sourced from UConn. The rest of the table is a calendar built from the same sources.
Why Your Bearded Iris Isn’t Blooming
This is the question behind half the searches. A bearded iris that won’t flower is usually telling you one of four things.
First, it is crowded. Overcrowding is the textbook cause, and it is the first thing to check if the plant bloomed well a few years ago and then faded.
Second, it is shaded. A tree that has grown up near the bed or a new fence can steal the six to eight hours of sun the plant needs.
Third, it is overfed. High nitrogen pushes leaf growth at the expense of flowers. UConn lists it alongside shade and crowding as a common cause.
Fourth, it is planted too deep. This one is common experience rather than a sourced figure, but it matches the rhizome’s biology. Dig and look.
A fifth explanation, which is not a fault at all: a newly divided rhizome often skips a year while it re-roots. Give it a season before you judge.
Pests and Diseases to Watch For
Three problems cause most of the grief. Knowing the calendar for each saves plants.
Iris borer. The University of Wisconsin Extension describes the cycle. Eggs overwinter on iris and nearby debris, hatch in early May, and the larvae tunnel into the leaves and down toward the rhizome. Symptoms often show in late June and July, with discolored, wilting plants and a pinkish-white caterpillar inside the rhizome.
Wisconsin’s guidance for control starts with sanitation: remove old debris near the iris. In spring, look for water-soaked spots on the leaves and crush young larvae by hand.
If you spray, timing is everything. The extension advice is to apply when new shoots reach four to six inches tall and repeat ten to fourteen days later, using a product containing azadirachtin, pyrethrins, permethrin or spinosad. Follow the label. Parasitic nematodes applied to the soil in June and early July have also worked.
Bacterial soft rot. Borer damage lets bacteria in, and the result is the sour smell people describe. UConn describes the sign as a bad-smelling yellow ooze at the rhizome and the base of the leaves. Prevention is proper planting and keeping rhizomes from staying wet.
Infected rhizomes usually have to go. If only part of the rhizome is affected, some gardeners cut away the mushy section with a sterilized blade and let the piece dry in the sun. That is common practice, not a sourced guarantee, so inspect the plant over the following weeks.
Leaf spot. The fungus Didymellina macrospora causes small yellow-brown spots with water-soaked borders that grow and turn brown, per Iowa State Extension. It does worst in mild, damp weather with poor air movement.
The fix is mostly cultural: remove diseased leaves and stalks in fall or early spring, give plants room, control weeds, and water at the base. If you need a fungicide, Iowa State lists chlorothalonil or myclobutanil and recommends a spreader-sticker because iris leaves are waxy.
| Symptom | Likely cause | First move |
|---|---|---|
| Water-soaked streaks on leaves in May | Iris borer larvae | Crush larvae by hand; clear debris |
| Collapsing fan in June or July, foul smell | Borer plus soft rot | Dig up; discard rotted parts; sanitize tools |
| Brown spots with yellow centers | Leaf spot | Remove affected leaves; improve airflow |
| Lush leaves, no flowers | Shade, crowding, nitrogen | Check sun, divide, cut back fertilizer |
| Rhizome heaved out of the ground | Late planting or frost | Press back, cover roots, expose top |
Using Bearded Iris in Garden Design and Cut Flowers
Because this is a decor site, a short word on how a bearded iris behaves as a design element. The flower is a statement, but the foliage is the quieter hero. The upright blades give a bed structure from spring to frost, while flowers last briefly.
Plant them in drifts of three to seven, as Illinois Extension suggests, rather than single plants. A single rhizome looks lonely, and a drift looks intentional.
Pair with plants that fill the gap after bloom. Perennials with softer, rounder foliage tend to hide the iris’s slightly bare midsummer look. This is general design advice rather than a sourced rule, so match companions to your own climate.
For cut flowers, bring a stalk indoors when the lowest bud is starting to open, and the rest are still closed. Each flower lasts only a short time, but a stalk carries several buds and opens in sequence. Re-trim the stem and change the water.
Use a tall, heavy vase. Tall bearded stalks are top-heavy and will tip a slim one.
For front-yard curb appeal, dwarf and intermediate classes line a walk beautifully and bloom before the tall ones, which gives the entrance an early reason to look good.
Common Mistakes That Cost People Their Irises
Burying the rhizome is the big one. A few others are worth naming.
Mulching the bed like any other perennial border. Extension advice says not to, because mulch holds moisture against the rhizome.
Planting in shade because the sunny spot was taken. The plant will survive and punish you by not flowering.
Using a high-nitrogen lawn fertilizer on the bed or letting lawn runoff reach it.
Skipping the clean-up. Leaving last year’s leaves in place hands borer eggs and leaf spot spores an easy winter.
Dividing too late in the year, so roots can’t anchor before frost.
Re-using unsterilized tools between a rotted rhizome and a healthy one.
Quick Answers
How deep do you plant a bearded iris? Barely. The rhizome should sit at or just below the soil surface, with the roots covered and the top exposed, adjusting slightly for clay versus sand.
When should you divide? Roughly six to eight weeks after bloom, which usually means July through September, and at least six weeks before first frost.
How often? Every three to five years, or sooner when the center stops blooming.
Do they need full sun? Yes. Aim for six to eight hours a day.
What kills them most often? Wet soil and borers, usually together.
Get those four things right, and a bed of irises will pay you back every May for many years.
FAQs:
How deep should you plant a bearded iris rhizome?
Plant it so the top of the rhizome is at or just above the soil surface in clay, or up to half an inch below in sandy soil, with roots buried and the top exposed. Planting deeper is the most common reason for no blooms.
When is the best time to divide bearded irises?
Roughly six to eight weeks after they bloom, usually July through September, and at least six weeks before the first fall frost. Illinois Extension names July and August as the best months.
How often should bearded irises be divided?
Every three to five years, or sooner when the center of the clump stops flowering, or the plants become crowded.
Why is my bearded iris not blooming?
Common causes are overcrowding, too little sun (less than six to eight hours), too much nitrogen fertilizer, and planting too deep. A freshly divided rhizome may also skip one season.
Should you mulch bearded irises?
No. UConn Extension advises against mulch because it may encourage rhizomes to rot. Keep the rhizome exposed and the bed well-drained.
What does a rotting iris rhizome smell like?
Sour and foul, often with a yellow ooze at the base of the leaves. This is bacterial soft rot, frequently entering through iris borer damage. Infected rhizomes usually need to be removed.