

A chandelier is the one light fixture people photograph before they photograph the furniture. It sets the mood of a room before anyone sits down, and it can also ruin that room if it is the wrong size or hangs at the wrong height.
Most mistakes are not about taste. They are about arithmetic. A fixture that is six inches too small looks timid, and one that hangs six inches too low gets in everyone’s sightline across the dinner table.
This guide covers the decisions in the order you will face them: how big, how high, which style, which bulbs, how to support the weight, and how to clean it without damaging the finish.
The sizing numbers come from published lighting guides, and I name each source. Where a point is general design practice rather than a sourced figure, I say so, so you know what to double-check.
Why Most Chandeliers Look Wrong
Walk through a few model homes, and you will notice a pattern. The fixture over the table is a polite little ring of bulbs hanging in the middle of a big room. It does its job and disappears.
The opposite mistake is just as common: an oversized fixture with too little clearance, so it feels like it is pressing down on the room.
Both come from choosing by picture. Product photos are shot against a blank background, so a 22-inch fixture and a 36-inch fixture can look identical on screen. The number in the spec sheet is the only thing that tells you how it will behave in your room.
So the first rule is to measure before you shop. You need the room’s length and width, the width of the table if there is one, and the ceiling height. With those three numbers, the rest is almost mechanical.
There is also a mood question that no formula answers. A chandelier is a focal point, so it should have a reason to be there. If the room has no architecture or furniture arrangement that wants a center, the fixture will look like it was placed for decoration alone.
Think of it as a piece of furniture hung from the ceiling. It needs a footprint, a position,n and a purpose, just like a sofa does.
Start With the Room: The Diameter Formula
The most widely repeated shortcut is also the simplest. Add the room’s length and width in feet, and the total is the chandelier’s diameter in inches.
Lighting Reimagined and Edward Martin both give this rule. A 12 by 14 foot room works out to about 26 inches.
Lighting Reimagined calls it “a starting point, not a law,” which is the right way to treat it. If you land between two sizes, it advises picking the larger one, because an undersized fixture tends to look like a mistake.
| Room size (ft) | Starting diameter (in) |
|---|---|
| 10 x 12 | 22 |
| 12 x 14 | 26 |
| 12 x 15 | 27 |
| 14 x 16 | 30 |
| 16 x 20 | 36 |
These values are simply length plus width, as the guides describe. Treat them as a first estimate and then check against the furniture below.
A chandelier sized this way works best when it is the main light in a room with a clear center, such as a dining room or a foyer. In a long, narrow living room, the formula can mislead you, because the fixture has no obvious center to anchor to.
In that case, size to the seating area it hangs over, not to the whole room. A fixture over a coffee table group should relate to the group, not the walls.
Sizing Over a Dining Table
Over a table, the table beats the room. The fixture should relate to the thing underneath it.
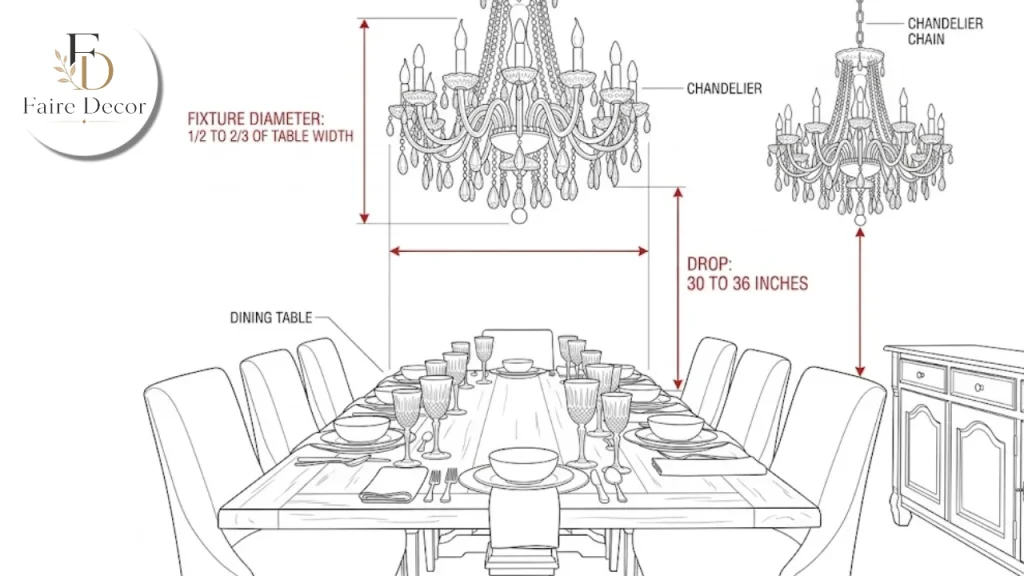
Lighting Reimagined says to use one-half to two-thirds of the table’s width. A 42-inch table suits a fixture roughly 21 to 28 inches across. Edward Martin gives the same range. Destination Lighting is a little more generous, saying half to three-quarters of the table’s width.
There is one more reason to stay inside that range. If the fixture is wider than the table, people lean into the hanging pieces as they stand up or sit down.
Rectangular tables are longer than they are wide, so a round fixture can look lost over them. For linear fixtures, Lighting Reimagined recommends one-third to one-half of the table’s length, and never longer than the table minus 12 inches on each end. A 72-inch table pairs with a linear fixture of 24 to 36 inches.
Round tables are the easy case. Use one-half to two-thirds of the table’s diameter, and a round or drum fixture will look right.
| Table type | Fixture rule | Example |
|---|---|---|
| Rectangular, round fixture | 1/2 to 2/3 of table width | 42 in table: 21 to 28 in |
| Rectangular, linear fixture | 1/3 to 1/2 of table length | 72 in table: 24 to 36 in |
| Round table | 1/2 to 2/3 of table diameter | 48 in table: 24 to 32 in |
The round-table example is simply the stated ratio applied to a 48-inch diameter.
If the table has leaves that extend it for holidays, size to the everyday width. The fixture should look right 350 days a year, not just on the day twelve people come to dinner.
How High to Hang It
This is where good fixtures go wrong. Even the right size looks wrong if it is hung too high or too low.
Over a dining table, Lighting Reimagined and Edward Martin both put the bottom of the fixture 30 to 36 inches above the tabletop. Destination Lighting says the longest point should be about 30 to 32 inches above the table. The ranges overlap, so about 32 inches is a safe place to start.
Those numbers assume an 8-foot ceiling. Lighting Reimagined adds about 3 inches of hanging height for every foot of ceiling above 8 feet. In a room with a 10-foot ceiling, that means starting around 36 to 42 inches and judging by eye.
| Situation | Guidance | Source |
|---|---|---|
| Over a dining table, 8 ft ceiling | Bottom of fixture 30 to 36 in above tabletop | Lighting Reimagined, Edward Martin |
| Taller ceilings | Add about 3 in per foot above 8 ft | Lighting Reimagined |
| Open rooms and hallways | At least 7 ft of floor clearance | Lighting Reimagined |
| Where people walk beneath | 7 ft 6 in recommended | Lighting Reimagined |
The height that looks right depends on how the fixture is built. A tall, narrow design has a long visual body. A flat drum reads lower. Hang a tall one a little higher than the numbers suggest if your table is close to the lower limit.
A simple test helps. Sit at the table and look across it at the person opposite. If the bottom of the fixture cuts into their face or the lamp glare hits your eyes, raise it an inch or two and test again.
If the fixture comes on a chain, you can usually adjust height by removing links. Rod-hung versions are harder. A commenter on the Destination Lighting guide notes that a stem or rod often cannot be shortened, and suggests converting to chain-hanging. That is a reader comment rather than the article’s guidance, so confirm with the manufacturer.
Entryways, Foyers and Staircases
Entries are the places where a chandelier earns its reputation. Visitors see it first, and from outside it can be visible through a window.
For a single-story entry, the same length-plus-width formula applies. For a two-story foyer, Lighting Reimagined says to go one size up, because the larger volume swallows an ordinary fixture.
In a two-story space,ce the bottom of the fixture should not hang lower than the second-floor line. A taller or multi-tier design, roughly two to three feet long or more, fits the vertical space better than a wide, flat one.
If there is a window above the front door, Lighting Reimagined suggests centering the fixture so that people see it from outside. That is a thoughtful detail, and it makes the house look welcoming at night.
Small entries are different. If the ceiling is low or the entry is narrow, a flush or semi-flush fixture may work better than a hanging chandelier. Nobody wants to duck under their own lighting.
For hallways and open walkways, the clearance numbers above apply. Seven feet of clearance is the floor. Seven and a half feet is better where tall people walk directly underneath.
I did not find a sourced sizing rule for staircases, so measure the stair path and keep the fixture clear of the handrail and the head height of anyone climbing. A licensed electrician or lighting designer can help in a tall stairwell, where installation is hard to do safely alone.
Other Rooms: Bedrooms, Kitchens and Living Rooms
A chandelier is not just for dining rooms. The rules change a little with the room, and the following points are general design practice rather than sourced figures.
In a bedroom, a small chandelier centered over the bed or in the middle of the room gives a softer, more personal light. Keep it high enough that nobody can hit it when sitting up in bed, and keep the scale modest.
Over a kitchen island, look for a linear or multi-light fixture sized to the island’s length. The same one-third to one-half length rule used for dining tables is a sensible guide. Choose finishes that wipe clean, because kitchen air carries grease.
In a living room, a chandelier works best when the seating is arranged around a center. Hang it high enough that it clears sightlines to the television or windows, and use a dimmer so it doesn’t overpower the room in the evening.
In a bathroom or any humid space, check that the fixture is rated for damp locations before you buy. The listing is printed on the product page or the label, and it matters for safety.
Whatever the room, the underlying idea is the same. The fixture should be sized to the furniture beneath it, hung to clear human heads, and chosen to match the way the room is used.
Choosing a Style That Fits the Room
Style is where taste comes in, and it is easier once the size is fixed. These are editorial observations rather than rules.
Crystal and cut-glass fixtures catch and scatter light. They suit formal dining rooms and entries with traditional detailing, and they reward good dimming. They also need more cleaning, as the section below explains.
Candle-style fixtures, with arms that hold bulbs shaped like flames, read as classic. In a modern room, they can look like a quote from another era. That is not a bad thing if you want contrast.
Drum and shade fixtures hide the bulbs behind fabric or glass. They give soft, even light and less glare, so they work well over tables where people sit for hours.
Modern geometric fixtures, such as branching arms, globes or linear bars, work in open-plan spaces where the fixture has to stand up to the volume. They read as sculpture even when they are not lit.
Rustic fixtures in wood, iron or rope suit farmhouse and lodge interiors. They are heavier visually than their size suggests, so go a size smaller than the formula if the room is small.
Beaded or woven fixtures bring texture and warmth. They suit casual dining rooms and bedrooms and tend to hide dust better than crystal.
Finish matters as much as shape on any chandelier. Brass and gold tones warm a room. Black frames give contrast against light walls. Chrome and nickel suit cooler palettes. Match the finish to hardware elsewhere in the room, such as faucets and cabinet pulls, rather than matching every metal exactly.
One more point about visual weight. A fixture with a lot of open space between the arms feels lighter than a solid one of the same diameter. If your room is small, choose airy over dense.
Bulbs, Dimmers and Light Quality
A chandelier is decorative lighting, so it rarely provides all the light a room needs. Plan for it to sit alongside wall sconces, lamps, or recessed lights, and treat it as the layer that sets mood.
Check the fixture’s label or manual for the maximum wattage per socket and use bulbs at or below that limit. This is a standard safety instruction on fixtures, and it matters most with older incandescent-style bulbs that run hot.
LED bulbs run cooler and use less power, and many are made in shapes that mimic candle flames and globes. Make sure any LED you buy is dimmable if you plan to use a dimmer, and check that the dimmer is compatible with LEDs.
Color temperature changes how the room feels. Warm white around 2700K is the usual choice for dining rooms and bedrooms. Cooler tones tend to feel clinical in a space meant for dinner. This is general practice, so try a bulb before you commit to a full set.
Dimmers are the cheapest upgrade for a fixture of this kind. A dining room that is bright for homework and soft for dinner is better than one fixed at a single level.
If the fixture uses clear bulbs with exposed filaments, expect more glare. Frosted or candle-shaped bulbs soften the look. Test one before replacing all of them.
Weight, Support and Installation

This section matters because a fixture hangs over people. Heavy crystal fixtures and large metal ones can weigh a good deal, and the box that holds them has to be up to the job.
The National Electrical Code addresses this in section 314.27(A)(2) for ceiling outlets. According to an Electrical Construction & Maintenance article, a luminaire weighing more than 50 pounds needs independent support, unless the box is listed for that weight and marked with its maximum weight inside.
That article is an opinion piece, and it quotes only part of the code. It also discusses luminaires generally, not chandeliers specifically. Check the current code edition and your local rules.
In practice, the safest approach is to read the manufacturer’s installation instructions first. They state the fixture’s weight and what kind of support it needs. Then compare that with the box in your ceiling.
If you are replacing an old fixture, do not assume the existing box can carry the new one. A box that held a light dome may not be rated for a heavy crystal fixture.
I recommend a licensed electrician for any installation that involves heavy fixtures, high ceilings, or wiring you are unsure about. It costs less than repairing a ceiling.
Before any work, turn off the circuit at the breaker, not just the wall switch, and confirm the power is off with a tester. Never work alone on a ladder with a heavy fixture.
Plan for the electrician to hang it at the height you chose from the formulas above. Tell them the tabletop height and the ceiling height, and mark the table position on the floor. They can then set the drop correctly the first time.
How to Clean a Chandelier Without Damaging It
Chandeliers collect dust, kitchen grease, and fingerprints. Crystal shows it most. Regular cleaning keeps the light bright and prevents buildup that is harder to remove later.
The steps below follow the IKEA cleaning guide.
Cut the power and let it cool. Turn off the electricity to the chandelier and wait until it is completely cool.
Remove the bulbs. Hold each bulb by its base so you do not damage it.
Dust first. Use a feather duster or a long-handled duster to remove loose dust before wiping.
Clean the crystals. Wipe each piece with a soft microfiber cloth.
Clean the frame. Use a soft cloth with a suitable cleaner, then dry it fully so nothing corrodes.
Reassemble and test. When everything is completely dry, reinstall the bulbs and check that the fixture works.
For solutions, the guide lists a commercial glass or crystal cleaner, isopropyl alcohol mixed with water, or vinegar and water lightly sprayed on a cloth for stubborn dirt.
What to avoid matters as much. Do not spray liquid directly onto the crystals, because it can drip into the sockets. Spray the cloth instead. Avoid harsh chemicals, abrasive materials, and lint-leaving cloths, and do not turn the lights on until everything is dry.
Handle crystals gently. They break more easily than they look, and a dropped piece is hard to match later. Place a soft towel under the fixture while you work, which is a common precaution in cleaning practice.
If the fixture is very high or very heavy, a professional cleaning service is a safer choice than a stepladder. Look for one that handles delicate lighting.
How often? Dust lightly every few weeks and do a full cleaning once or twice a year. Kitchens and rooms with open windows may need it more often. That schedule is general practice rather than a sourced figure.

Common Mistakes to Avoid
Choosing by photo instead of by dimension. Check the diameter and the drop in the specifications every time.
Hanging it too high because the ceiling is high. Over a table, the 30 to 36 inch guide still applies. Leave the extra height in the stem or chain, not between the fixture and the table.
Ignoring the ceiling box. Check the weight and the support before you buy, not after.
Picking a fixture that is wider than the table. People will brush against the hanging pieces.
Overloading the sockets. Use bulbs at or below the wattage on the label.
Cleaning with the power on or with a dripping cloth. Cut the power and wring the cloth out.
Relying on one fixture for all the light. Add lamps or sconces so the room works when the fixture is dimmed.
Quick Answers
What size chandelier do you need? Start by adding the room’s length and width in feet, and read the total as inches of diameter. Over a table, use one-half to two-thirds of the table’s width.
How high should it hang? About 30 to 36 inches above the tabletop with an 8-foot ceiling, and a few more inches for every extra foot of ceiling.
Can any ceiling box hold it? No. Check the fixture’s weight and the box rating, and use a licensed electrician for heavy fixtures.
How do you clean it? Power off, cool, bulbs out, dust, wipe with a damp microfiber cloth, dry fully, and test.
Get size, height, support, and cleaning right, and the fixture will look right for years.

FAQs:
What size chandelier do I need for my room?
Add the room’s length and width in feet and read the total as the diameter in inches. A 12 by 14 foot room suggests about 26 inches. Treat it as a starting point and go up a size if you land between two.
How big should a chandelier be over a dining table?
About one-half to two-thirds of the table’s width. A 42-inch table suits a fixture roughly 21 to 28 inches across.
How high should a chandelier hang above a dining table?
The bottom of the fixture should sit about 30 to 36 inches above the tabletop with an 8-foot ceiling, adding about 3 inches for each extra foot of ceiling height.
How much clearance does a chandelier need in a hallway or entry?
At least 7 feet of floor clearance, and 7 feet 6 inches where people walk directly underneath.
Can my ceiling box support a heavy chandelier?
Not necessarily. Check the fixture’s weight against the box rating and the manufacturer’s instructions. The NEC discusses independent support above 50 pounds, so use a licensed electrician for heavy fixtures.
How do I clean a crystal chandelier safely?
Turn off the power, let it cool, remove the bulbs, dust, wipe the crystals with a microfiber cloth, dry everything fully, then reassemble. Spray the cloth, not the crystals.