
You walk into your living room one morning, coffee in hand, and the sunlight catches it at just the wrong angle—a long, ugly scratch glaring back at you from your favorite dining table or hardwood floor. It happens to everyone, and honestly, it’s one of the most frustrating things about owning beautiful wood furniture. But here’s the good news: fixing scratches on wood is far more achievable than most people think, and in most cases, you don’t need to spend hundreds of dollars on professional refinishing.
Whether you’re dealing with a nick in wood from moving furniture, deep gouges carved by a rambunctious puppy, or the persistent calling card of a curious cat, there are proven, practical solutions for virtually every level of damage. From pantry-staple home remedies to professional-grade products, this guide walks you through everything you need to know about wood scratch repair—clearly, honestly, and without any fluff.
According to the American Furniture Manufacturers Association, Americans spend over $60 billion annually on home furnishings, yet very few know the simple techniques that can extend the life of wood pieces by decades. A little know-how goes a long way. So set down that coffee, take a closer look at what you’re working with, and let’s get that wood looking beautiful again.
🪵Wood Scratch Types at a Glance
Surface scratches (left) affect only the finish layer. Mid-depth scratches (center) reach the stain or color coat. Deep scratches and gouges (right) penetrate into the wood fiber itself—each requires a different repair approach.

Visual comparison of scratch depths on wood surfaces — surface, mid-depth, and deep gouges
Understanding the Damage Before You Begin Any Wood Scratch Repair
Not all scratches in wood are created equal. Before you reach for any product, the single most important step is correctly identifying the type and depth of damage you’re dealing with. Treating a deep gouge the same way you’d treat a light surface scuff is a recipe for frustration—and possibly making things worse.
Surface Scratches vs. Deep Scratches
Run your fingernail across the scratch. If your nail glides right over it without catching, you’re dealing with a surface-level scratch that only affects the finish or topcoat—not the wood itself. These are the easiest to fix wood scratches and often respond to nothing more than a good furniture polish or a dab of oil. On the other hand, if your nail catches or dips into the groove, the scratch has penetrated past the finish and into the wood grain, and you’ll need a more involved approach for proper furniture scratch repair.
There’s also a middle category: scratches that have gone through the finish and stain but haven’t deeply gouged the wood fiber. These show up as discolored lines—often lighter or whitish—against the surrounding finish. Knowing which category your damage falls into will determine which of the methods below is right for you.
Assessing the Finish Type
The type of finish on your wood matters enormously when planning how to fix scratches on wood furniture. Common finishes include polyurethane, lacquer, shellac, varnish, and oil or wax finishes. Each responds differently to repair products. A quick test: dab a small amount of denatured alcohol in an inconspicuous spot. If the finish softens or dissolves, you likely have shellac. If acetone (nail polish remover) affects it, you may have lacquer. Polyurethane and varnish are generally more resistant. Knowing your finish helps you pick the right approach for scratched wood repair without accidentally stripping what’s already there.
🔍 Quick Scratch Identification Guide
🪶Surface Scratch
Nail glides over it. Only finish affected. Easy DIY fix with polish or oil.
✏️Mid-Depth Scratch
Light discoloration. Stain layer damaged. Use markers, wax sticks, or scratch cover.
🔪Deep Gouge
Nail catches in groove. Wood fiber damaged. Requires filler, putty, or sanding.
🐾Pet Claw Marks
Multiple parallel lines. Varies in depth. Often needs combination repair approach.
💧Water Ring
White haze or ring. Finish moisture damage. Iron or mayonnaise trick often works.
🪑Edge Nick
Corner or edge chip. May need epoxy filler or wood putty to rebuild shape.
Simple Home Remedies for Fixing Scratches on Wood
Before you spend any money, it’s worth knowing that some of the best fixes for scratched wood are already sitting in your kitchen or bathroom cabinet. These DIY approaches work particularly well on light to moderate surface scratches and are gentle enough to try first without any risk of further damage.
The Walnut Trick for Light Scratches
This is probably the most well-known natural remedy for fix scratches in wood, and it genuinely works. Take a raw, shelled walnut (not roasted, not salted—just plain), and rub the nut meat directly along the scratch, following the grain of the wood. The natural oils in the walnut seep into the damaged area and help disguise the lighter color of exposed wood. After rubbing, let the oils absorb for a few minutes, then buff with a soft cloth. It won’t fill a deep gouge, but for surface marks on darker wood, it’s surprisingly effective. Pecans and Brazil nuts work similarly if you don’t have walnuts on hand—this is genuinely a natural way to remove scratches from wood.
Petroleum Jelly and Baking Soda Paste
For light surface abrasions and nicks on wood, a paste made from one part baking soda and two parts petroleum jelly (Vaseline) can serve as a gentle abrasive filler. Mix the two together into a thick paste, apply it to the scratch with a soft cloth, rub gently in the direction of the grain, then wipe away the excess. The baking soda provides mild abrasion to blend the edges while the petroleum jelly conditions the surrounding wood.
Olive Oil and White Vinegar
Equal parts olive oil and white vinegar create a simple homemade scratch cover for wood that can work well on medium-toned hardwoods. The vinegar cleans the scratch while the oil moisturizes and darkens the exposed wood to better match the surrounding finish. Apply with a soft cloth, let sit for a minute, then buff in circular motions. This mixture is particularly useful as a furniture polish for scratches on regularly maintained pieces.
The Mayonnaise Method
While it sounds absurd, mayonnaise—yes, the condiment—is a legitimate remedy for white hazy scratches and water rings on finished wood. The oil content penetrates the finish and helps displace trapped moisture that causes that cloudy, white appearance. Apply a generous dollop directly onto the scratch, leave it for several hours or overnight, then wipe it away and buff the surface. This is one of the better options for those wondering how to get rid of scratches on wood that appear more as discoloration than a physical groove.
🛠️ DIY Wood Scratch Repair Tools
Common tools for home wood scratch repair: walnut, wax crayon sticks, wood filler, fine-grit sandpaper, wood stain markers, soft cloths, and finishing oil. Most are inexpensive and widely available at hardware stores.
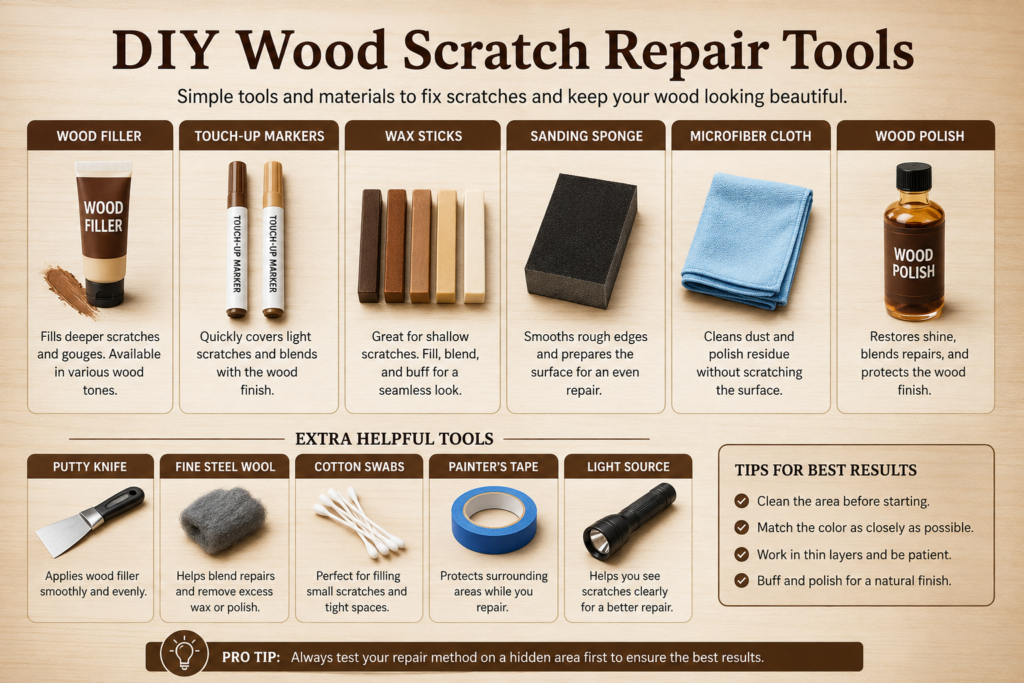
DIY wood scratch repair toolkit laid out on a wooden surface
How to Fix Wood Scratches with Store-Bought Products
Once you’ve moved beyond the home remedy territory, there’s a surprisingly robust lineup of commercial products designed specifically for wood furniture scratch repair. These range from inexpensive markers and wax sticks to more advanced filler compounds that can tackle serious damage.
Wood Stain Markers and Touch-Up Pens
For anyone wondering how to cover wood scratches quickly and cleanly, touch-up markers are one of the handiest tools available. These look and work much like felt-tip markers but are filled with wood stain in a range of popular wood tones—from light pine to dark walnut. They’re ideal for how to fix scratches on stained wood because you can choose a color that closely matches your finish.
Application is simple: color over the scratch following the wood grain, wipe away any excess before it dries, and let it cure for an hour before touching. Most quality markers contain colorfast dyes that resist fading. Minwax, Old English, and Mohawk all make highly rated versions. This method is also excellent for how to fix scratches on dark wood furniture, where color matching is especially important—lighter scratches on dark stain are particularly noticeable.
Wax Sticks and Crayon-Style Fillers
Wax filler sticks are the go-to method for fill in scratches on wood that have some physical depth to them. They work like a crayon—you simply rub the wax stick over the scratch until the groove is filled, then use a plastic putty knife or credit card to level the surface, followed by buffing with a soft cloth. The result is a smooth, filled area that visually blends with the surrounding wood.
These are especially effective for how to fill in wood scratches on furniture legs, tabletops, and cabinet faces. The catch is that wax scratches relatively easily compared to a hardened finish, so they’re best on pieces that aren’t in constant heavy use. For higher-traffic surfaces, consider a shellac stick, which melts with heat and hardens to a more durable finish.
💡 Pro Tip: When using wax sticks or markers, always test in an inconspicuous area first—the inside of a drawer, underneath the table, or on the back of a cabinet door. Wood tones vary significantly even within the same species, and lighting conditions affect how colors appear.
Wood Filler and Putty for Deeper Damage
For genuinely deep damage—the kind of groove you can feel clearly with your fingertip—standard wax or marker fixes won’t cut it. This is where how to repair deep scratches in wood furniture requires a proper filler compound. Wood filler (also called wood putty or wood patch) comes in two main forms: water-based and solvent-based. Water-based fillers are easier to work with, sand better, and have less odor; solvent-based fillers are generally more durable and adhesive.
To use: clean and dry the scratch thoroughly, apply filler with a putty knife pressing firmly into the groove, let it dry completely per product instructions (usually 30–60 minutes for small repairs), then sand flush with 220-grit sandpaper, moving always in the direction of the grain. Once sanded smooth, you’ll need to color-match the repaired area using a stain, marker, or tinted finish coat before applying a protective topcoat. This process answers the question of how to fix deep scratches in wood table surfaces with lasting results.
Epoxy Wood Filler for Major Gouges
For significant damage—missing chunks, large claw marks on wood, or extensive knicks in furniture—two-part epoxy wood filler is the most durable option available to DIYers. It works by mixing two components that chemically harden into an extremely tough, paintable, and sandable material. Epoxy doesn’t shrink like regular wood putty, making it ideal for structural repairs and large voids. The trade-off is that it requires more effort to color-match since it doesn’t stain the same way natural wood does—it typically needs paint or tinted filler on top for a seamless look.
How to Repair Deep Scratches in Wood Furniture Step by Step
Deep damage deserves a more detailed walkthrough. Follow this process for how to repair deep scratches in wood furniture and you’ll get the best possible result without having to hire a professional.
Step 1 – Clean the Area
Use a soft cloth with a small amount of mineral spirits to clean the scratched area. This removes wax, polish, and grime that would prevent filler from bonding properly. Let it dry completely before moving on.
Step 2 – Choose and Apply Your Filler
Select a filler that matches your wood tone as closely as possible. For most furniture, a pre-tinted wood putty in a similar color is ideal. Press the filler firmly into the scratch using a flexible putty knife, overfilling slightly to account for shrinkage. Smooth the surface as best you can at this stage.
Step 3 – Sand Flush
Once fully dry, use 220-grit sandpaper to sand the filled area flush with the surrounding surface. Always sand in the direction of the wood grain—never across it. Wipe away all dust with a tack cloth or damp rag.
Step 4 – Color Match
This is the most critical step for how to repair wood furniture scratches nicks and more invisibly. Apply a matching wood stain to the filled and sanded area, feathering it out slightly beyond the repair to blend naturally. Multiple thin coats generally produce better results than one heavy coat.
Step 5 – Apply a Protective Topcoat
Seal your repair with a clear topcoat—polyurethane, lacquer, or a finishing oil—that matches the existing finish sheen level (matte, satin, or gloss). This locks in the color match and protects the repair from future wear. For how to touch up wood furniture properly, matching the sheen level is almost as important as matching the color.
How to Get Cat Scratches Out of Wood and Dog Scratches Too
Pet owners have a particular challenge: cat scratches on wood and claw marks on wood from dogs tend to cluster, are often varied in depth, and can run across the grain in ways that are harder to disguise. That said, how to repair cat scratches on wood follows the same principles—it just often requires more patience and a combination of techniques.
Dealing with Cat Scratches
Cats tend to scratch in repetitive patterns on the same spot, meaning their damage can penetrate fairly deep even if individual lines are narrow. For light cat scratches on wood, a wax stick or touch-up marker often does the job. For deeper feline damage, you’ll need to assess each scratch line individually—some may only need a marker, while the deepest ones will need filler before color matching. How to fix cat scratches on wood effectively often means working in sections across the damage rather than treating it as one uniform scratch.
For those wondering how to fix deep cat scratches on wood, especially on soft wood species like pine, the process is more involved: clean the area, apply epoxy or wood filler to the deepest channels, let cure, sand carefully (using a sanding block to keep the surface level), stain to match, and seal. The key is patience between steps—rushing the drying process is the most common mistake people make.
Handling Dog Scratches on Wood Furniture
Dog scratches are often broader and more irregular than cat scratches, especially from larger breeds. How to get dog scratches out of wood and how to fix dog scratches on wood furniture typically involves the same filler and stain approach, but you may need to use a wider putty knife for broader marks. After the repair, applying a harder topcoat (like a water-based polyurethane with an aluminum oxide additive) can help the surface resist future scratching more effectively.
⚠️ Before You Start: Always test any product—stain, filler, or marker—in a hidden area first. Wood species, existing finish types, and stain colors vary enormously. What works perfectly on oak may look wrong on pine or cherry.
🐾Pet Scratch Repair: Before and After
Pet claw marks on hardwood before repair (left) and after treatment using wood filler, stain matching, and polyurethane topcoat (right). With the right technique, even significant pet damage can be made nearly invisible.
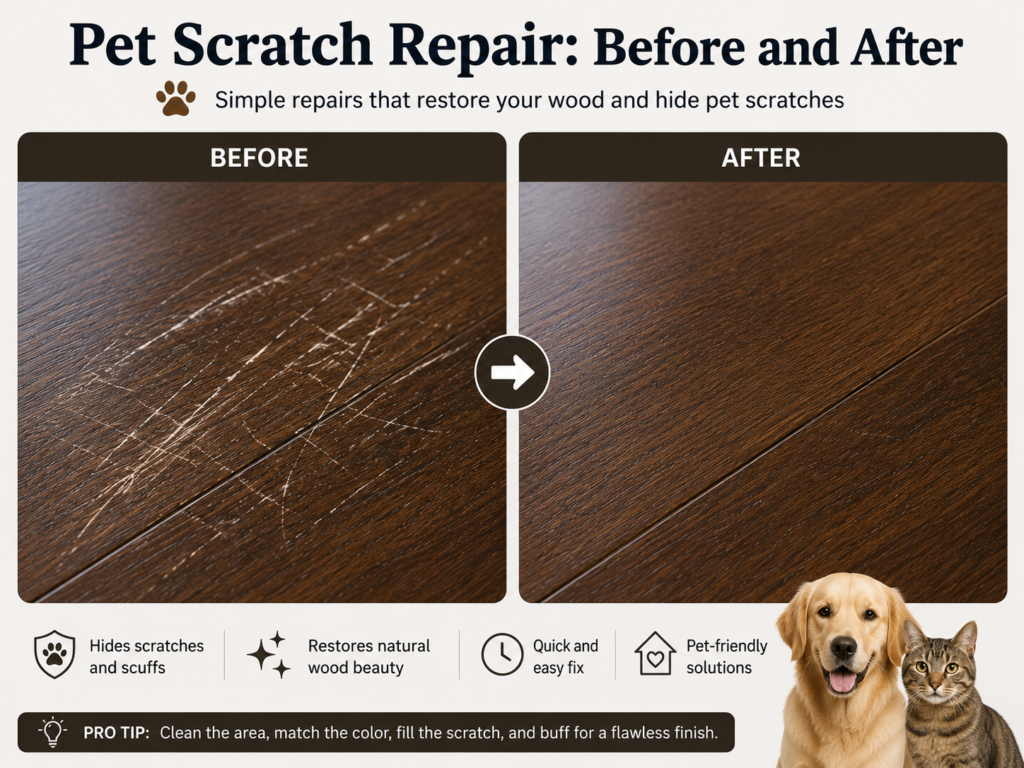
Before and after comparison of cat and dog scratch repair on hardwood wood furniture
Fixing Wood Scratches on Specific Furniture Types
Different pieces present different challenges. A scratched wood table in a high-traffic dining room needs a more durable fix than a decorative side table. Here’s how to think through repairs by furniture type.
How to Fix Scratches on a Wood Table
Tabletops take the most abuse of any piece of furniture, so durability is the priority when thinking about how to fix scratches on wood table surfaces. For light scratches, oil-based touch-up products tend to hold up better than wax because they penetrate the grain rather than just sitting on top. For deeper damage, an epoxy filler followed by a polyurethane topcoat provides the hardest wearing repair. Also consider that dining tables benefit from protective pads or a glass top over high-use sections—prevention is always easier than repair furniture scratches.
How to Fix Scratches on Wood Cabinets
Cabinet surfaces are often finished with lacquer rather than polyurethane, which means they respond well to lacquer-based touch-up products. How to fix scratches on wood cabinets is usually a matter of cleaning the scratch, applying a matching lacquer-based marker or filler, and finishing with a compatible clear coat. Because cabinets have more recessed and detailed areas than flat tabletops, a fine-tip marker is often more precise and practical than a brush-applied stain.
Repairing Scratches on Wood Floors
For how to fix scratched hardwood floors, the approach depends heavily on how the floor is finished. Polyurethane-finished floors can often be repaired with hardwood floor touch-up kits that include colored crayon sticks and a scratch-repair liquid. Oil-finished floors respond well to buffing with matching hardening oil. For extensive floor damage, a professional drum sander refinish may ultimately be the most cost-effective long-term solution, but for isolated scratches on wood table of flooring, DIY methods work well.
Restoring Antique and Dark Wood Pieces
Antique furniture requires extra caution—many pieces have irreplaceable original finishes or patinas. How to restore scratched wood on antiques without devaluing them means avoiding modern fillers and polyurethanes where possible. Instead, use shellac-based products (which are historically appropriate and reversible), tinted wax, or oil-based touch-up products. If you’re uncertain, consult a furniture conservator before proceeding. For how to fix scratches on dark wood furniture specifically, dark-tinted wax applied over a marker repair can help blend the color more seamlessly in low-light conditions.
How to Remove Scratches from Wood Using Sanding and Refinishing
When scratches are extensive, widespread, or the finish has simply seen better days, spot repairs can start to look patchy. Sometimes the most honest answer to how to remove scratches from wood is a full surface refinish. This is more work, but it produces results that can make even badly damaged furniture look factory-fresh.
When to Sand vs. When to Spot-Repair
Sand and refinish when: the damage covers more than a quarter of the surface, spot repairs would require too many touch-ups to blend invisibly, the existing finish is peeling or alligatoring, or the piece is a high-value heirloom worth the investment of time. Spot repair when: damage is isolated to a small area, the finish elsewhere is in good shape, and color matching can be accomplished reasonably well.
The Sanding Process
For how to repair scratches on wood furniture via full refinishing, start with 80-grit sandpaper on a sanding block or orbital sander for initial material removal, move to 120-grit to smooth out the 80-grit scratches, finish with 220-grit for a smooth surface ready for staining. Always sand with the grain, never against it. Remove all dust with a vacuum and tack cloth before applying any stain or finish. This process answers how to get scratches out of furniture in a comprehensive, long-lasting way.
Preventing Future Scratches: Protecting Your Wood After Repair
The best scratched furniture repair strategy, long-term, is prevention. Once you’ve put in the work to fix scratches on furniture wood, a few simple habits and protective measures can dramatically extend how long your repair lasts—and keep new damage from forming.
- Place felt pads under the legs of all furniture pieces that sit on wood floors
- Use placemats, coasters, and table pads on dining and coffee tables
- Keep pet nails trimmed regularly to minimize claw marks on wood
- Apply a fresh coat of finishing wax or oil to wood surfaces every 6–12 months
- Avoid dragging items across wood surfaces—always lift
- Use furniture sliders when rearranging rooms
- Keep wood away from excessive heat and humidity, which can cause swelling that weakens the finish
Applying a quality paste wax or hardening oil as a regular maintenance step is one of the most effective long-term scratch cover for wood strategies—it builds up a sacrificial layer over the finish that absorbs minor abrasion before it reaches the wood.
Frequently Asked Questions
What is the easiest way of fixing scratches on wood at home?
For light surface scratches, rubbing a raw walnut along the grain is the easiest natural fix. For slightly deeper marks, a wood stain touch-up marker in a matching color is fast, inexpensive, and highly effective. For deeper gouges, a wax filler stick followed by buffing provides a quick improvement without requiring sanding or refinishing.
How do I know if my scratch needs professional repair?
If the scratch is so deep that a large amount of wood fiber has been displaced or removed, if the piece is a high-value antique with an original finish, or if your repair attempts have made the area look worse rather than better, it’s worth consulting a professional furniture restorer. Most straightforward wood scratch repair jobs are well within DIY capability, but structural damage is a different matter.
How do you get cat scratches out of wood furniture?
To repair cat scratches on wood, first assess the depth. Light surface marks respond to wax sticks or touch-up markers. Deeper cat scratches on wood require wood filler applied with a putty knife, dried completely, sanded flush, then stained and sealed to match the surrounding finish. Patience between steps is key.
Can I use toothpaste to remove scratches from wood?
Non-gel white toothpaste has a mild abrasive quality that can buff out very light surface marks on some finishes. However, it’s not a reliable method and can potentially dull or streak the finish around the scratch. It’s better used as a last resort on items with no other remedy available. Dedicated furniture scratch repair products will almost always give better results.
What’s the best product for filling deep scratches in wood?
For deep scratches and gouges, two-part epoxy wood filler is the most durable and long-lasting option. For smaller deep scratches, a pre-tinted water-based wood filler that matches your wood tone works well and is easier to sand. Shellac sticks (melted with a heat tool) are a professional favorite for precise, small-area wood scratch fix jobs.
How do you hide scratches in wood without refinishing?
How to hide scratches in wood without a full refinish includes: using colored wax sticks or filler sticks that match the wood tone, applying wood stain markers to recolor exposed raw wood, rubbing with walnut or pecan oil for light marks, and finishing with a matching clear topcoat or furniture polish. Strategic placement of table runners, decorative items, or a glass tabletop can also conceal scratches in heavily trafficked areas.
How do I fix scratches on dark wood furniture?
Dark wood shows lighter scratches most dramatically because the exposed raw wood contrasts sharply with the dark stain. For how to fix scratches on dark wood furniture, use a touch-up marker in the darkest available matching shade, apply dark-tinted finishing wax over the repair to blend edges, and seal with a gloss or satin clear coat matching the original sheen. Espresso, ebony, and dark walnut stain pens are available from most hardware stores.
Is it worth repairing scratched wood furniture or should I replace it?
In most cases, repair is absolutely worth it—both financially and environmentally. Even significant scratched wood damage can be repaired for under $30–50 in materials, versus hundreds or thousands to replace quality solid wood furniture. Solid wood pieces, in particular, can be sanded back to bare wood and completely refinished, effectively giving them a new lease on life. Replace only when structural damage makes the piece unsafe or unusable.
How do you fix scratches on a wood table that has a polyurethane finish?
For how to fix a scratch on a wood table with polyurethane finish: lightly sand the scratched area with 220-grit sandpaper (just enough to level the scratch), clean thoroughly, apply a matching stain if the scratch is color-visible, then apply one or two thin coats of polyurethane matching the original sheen. Feather the edges of the new finish into the old to avoid a visible boundary line.
Conclusion
Wood is one of the most forgiving materials in the home—it can be cleaned, sanded, stained, and refinished in ways that synthetic materials simply can’t match. That’s what makes fixing scratches on wood not just a practical skill, but a genuinely rewarding one. From walnut-rubbing a hairline surface mark to carefully filling and refinishing a deep pet gouge, there’s a solution at every skill level and every budget.
The key is always to start with the least invasive method and work your way toward more intensive techniques only if needed. Clean the scratch, assess its depth, choose the right product, work patiently in the direction of the grain, and always finish with a protective coat. Do that, and your wood furniture will repay the effort with years—often decades—of continued beauty.
Whether you’re tackling a scratched wood table, nicks in wood on a beloved heirloom, or the aftermath of years of pets and family life, you now have everything you need to handle it confidently. Roll up your sleeves, pick up that wax stick or walnut, and give your wood the care it deserves.