

Good kitchen cabinet plans save you from the most expensive mistakes in a kitchen project: a wall cabinet hung too low, a drawer that hits a fridge door, a run of boxes that ends two inches short of the wall. A plan is mostly measuring and deciding, and the building comes after.
This guide covers standard cabinet sizes, how four sources compare, face frame versus frameless boxes, a build order for DIYers, and a planning checklist. I name each source, flag the commercial ones,s and note where the figures disagree. I found no prices that I could tie to a source, so none appear here.
What a good plan contains
Before any sawdust, kitchen cabinet plans answer five questions. Writing the answers down turns a vague idea into something a cabinet maker, a supplier,er or you on a Saturday can work from.
Which walls get cabinets? List every wall, window, door,oor and appliance opening.
What goes where? Sink base, range, refrigerator, dishwasher,sher and pantry are the fixed points.
Which sizes? Pick widths from the standard increments in the next sections.
Which construction? Face frame or frameless, and what material?rial.
Who builds it? Stock cabinets, custom work, or your own hands.
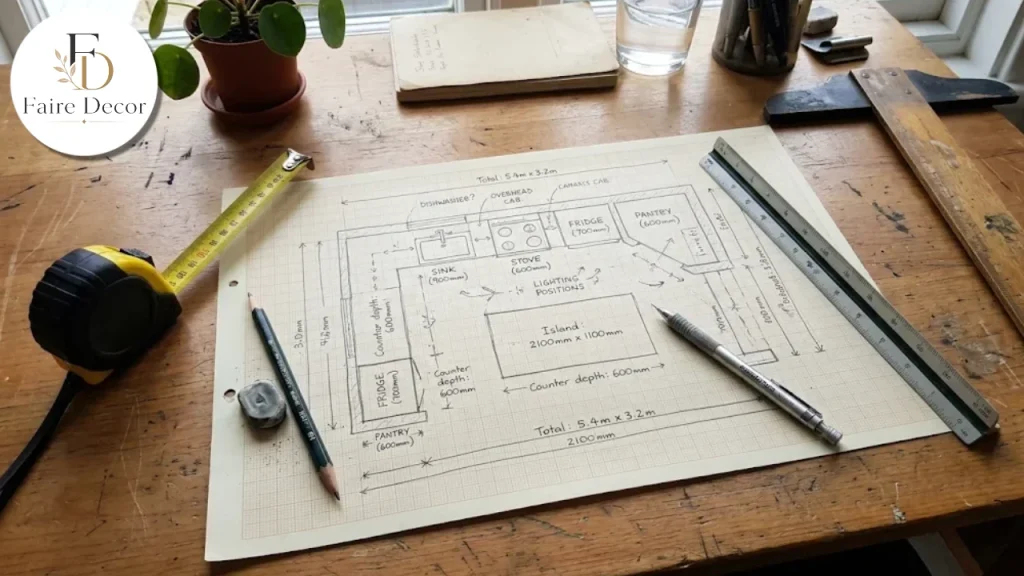
If you only do one thing from this article, draw the room to scale on graph paper and mark every obstacle. Everything else follows from that drawing.
Standard base cabinet sizes
Base cabinets sit on the floor and carry the countertop. For kitchen cabinet plans, Bob Vila’s guide, updated in August 2026, says the standard base cabinet height is 34½ inches. With a countertop,p the overall height is about 35 to 36 inches.
Depth is 24 inches as the standard. The same page mentions 12, 15, or 18 inches for special uses. Angi agrees on 34½ inches for the box and 36 inches with the countertop, and gives about 25 to 26 inches of depth once the countertop is on.
Widths run in 3-inch steps. Bob Vila gives 12 to 60 inches, with 12, 18, 24, 30, and 36 inches most common. Angi’s text gives 9 to 48 inches, though its own summary table lists only 12 to 30 inches, so that page contradicts itself.
Standard wall cabinet sizes
Wall cabinets, also called uppers, are shallower than base cabinets so you can work under them. Bob Vila gives 12, 18, 3,0 and 36 inches as standard heights, with 42 and 48 inches also available. Depth is most commonly 12 inches.
Angi gives heights of 30, 3,6 or 42 inches in its text and says 15 to 18 inches of depth is common above a microwave. Bob Vila says up to 18 inches over a microwave or stove and up to 24 inches over a refrigerator.
Quik Cabinets, a commercial seller, lists standard wall cabinets at 9 to 42 inches wide and 30, 36, or 42 inches high. Those figures describe what the company sells, so read them as one catalog rather than a universal rule.
Standard tall cabinet sizes
Tall cabinets handle pantries and oven stacks. Bob Vila gives 84 or 96 inches in height, which is 7 or 8 feet, and Angi gives about 8,, 90 or 96 inches. Both give 24 inches as the usual depth, with 12 inches sometimes used.
Quik Cabinets pairs tall heights with wall heights: 84-inch tall cabinets with 30-inch uppers, 90 with 36, and 96 with 42. That pairing is the seller’s advice, but it is a handy way to keep the tops of a run level.
The numbers side by side
| Item | Bob Vila | Angi | Quik Cabinets (seller) |
|---|---|---|---|
| Base height | 34½ in | 34½ in | 34.5 in |
| Base depth | 24 in | 24 in | 24 in |
| Base width | 12 to 60 in | 9 to 48 in (text) | 9 to 45 in by type |
| Wall height | 12, 18, 30, 36 in (42, 48 also) | 30, 36, 42 in | 30, 36, 42 in |
| Wall depth | 12 in typical | 12 in typical | 12 in standard |
| Tall height | 84 to 96 in | 84, 90, 96 in | 84, 90, 96 in |
| Tall depth | 24 in | 12 or 24 in | 24 in |
The agreement is strong where it matters. A 34½-inch base box that is 24 inches deep, a 12-inch-deep upper, and a tall unit near 84 to 96 inches show up everywhere. The differences are in the margins: how wide, how short, how deep for special cases.
Countertop height and the gap above it
A 1½-inch countertop on a 34½-inch base gives a work surface of 36 inches, which is what Quik Cabinets states. Bob Vila says the finished height is about 35 to 36 inches and adds that accessible designs may use 30 to 32 inches, while islands or coffee bars may go up to 38 inches.
The space between countertop and upper cabinets is the other number to fix early. Bob Vila says the standard distance is 18 inches, or roughly 54 inches from the floor. Quik Cabinets also says about 18 inches. Over a range, Bob Vila advises 24 inches or more.
Angi gives no gap, but says backsplash plans should be considered when choosing wall cabinet height. That is sensible advice: tile that runs up to the cabinet bottom changes how much space you want.
Planning around the room
The standard sizes only matter once they meet a real room. Walk through these checks with your drawing.
Measure each wall twice. Write down total length, plus the position of every window, door,r and outlet.
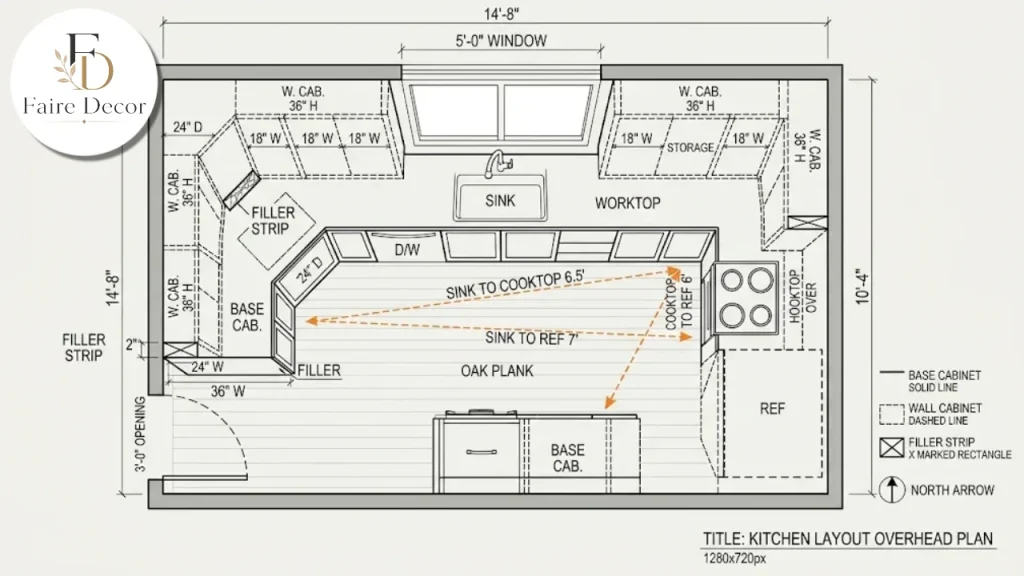
Mark fixed openings. Note the refrigerator, range, and dishwasher widths from the appliance specs, not from memory.
Check ceiling height. Quik Cabinets says 30-inch uppers suit 8-foot ceilings with crown molding, 36-inch uppers maximize storage under 8-foot ceilings, and 42-inch uppers run to the ceiling in 9-foot rooms.
Allow for fillers. Cabinets come in 3-inch width steps, so Quik Cabinets notes that filler strips of 3 to 6 inches are often needed, and advises planning 1½ to 3 inches of filler at each wall and at corners so doors and drawers clear adjacent cabinets.
The filler point trips up many first-time planners. Rooms are rarely square, so you build in a margin and let a filler or scribe strip absorb it.
Common kitchen cabinet layouts
I did not find a sourced guide that ranks kitchen layouts, so I will keep this to a plain description of how people usually arrange the same cabinets. These are general observations, not measurements.
Single wall. All cabinets and appliances on one wall. Simple, and well suited to small rooms.
Galley. Two parallel runs. Efficient, but keep the walkway clear.
L-shaped. Two adjoining walls, which creates a corner that needs a corner cabinet.
U-shaped. Three walls of cabinets, with two corners to plan.
Island. Any layout plus a freestanding run. Bob Vila notes that islands can use a taller base up to 38 inches.
Whatever you choose, the same size rules apply. Only the corners and the number of runs change.
Corner cabinets
Corners are where a plan gets tricky. Quik Cabinets lists corner base cabinets with a lazy Susan at 33 to 45 inches wide and 24 to 36 inches deep. Its wall corner cabinets run 24 to 27 inches wide.
Dead corners waste space, and the solution is a design decision: a lazy Susan, a blind corner,r or a diagonal unit. I did not find a sourced comparison of the three, so I will leave you with a question for your supplier: how much shelf space do I actually get from each?
Face frame or frameless?
Every set of kitchen cabinet plans also picks a box style. A face frame cabinet has a solid wood frame across the front of the box. A frameless cabinet has no frame, and the plywood edges are covered with edge banding.
CabinetNow, a company that sells both, describes its face frame boxes with a 3/4-inch solid hardwood frame and a 1/2-inch plywood carcass. Its frameless boxes use 3/4-inch plywood with banded edges. The base face frame is 1.5 inches wide, and the top rail on uppers is 2.25 inches.
Ana White’s building guide covers both. For face frame cabinets,ts she uses 1×2 trim attached with glue and brad nails, and for frameless,ess she bands the front edges. Her carcass material is 3/4-inch cabinet-grade plywood in both cases.
CabinetNow’s page does not compare access, storage, look, or cost, so I cannot give you a ranking from that source. What the sources do show is a difference in how the box is made and finished. A few practical points follow from them.
Exposed sides. CabinetNow says applied panels are strongly recommended on frameless boxes to cover exposed sides.
Adjustable options. It lists leg levelers with or without a toe kick on frameless base and tall units.
Shelf holes. Both styles use 3/4-inch adjustable shelves with 5mm pin holes on 35mm centers.
Ask your supplier to show you both in person if you can. The right pick depends on the look you want and the tools you own.
Materials for a DIY build
Ana White’s guide is the most detailed source I opened on building. It is a free guide on a woodworking site, so treat it as one builder’s method rather than the only way.
| Part | Material in the guide |
|---|---|
| Carcass | 3/4-inch cabinet-grade plywood |
| Back | Optional 1/4-inch plywood |
| Face frame | 1×2 trim |
| Drawer boxes | 1×3 or 1×4 boards, 1×8 for larger drawers |
| Drawer bottoms | 1/4-inch hardwood plywood |
| Doors | 1×3 hardwood with 1/4-inch plywood panels |
| Slides | 22-inch bottom-mount |
| Hinges | Concealed full-overlay, 2 per standard door |
She estimates two base cabinets per sheet of plywood, depending on size, and about 10 feet of edge banding and 30 pocket hole screws per cabinet. These are her estimates for her designs, so check your own cut list.
Tools you will want
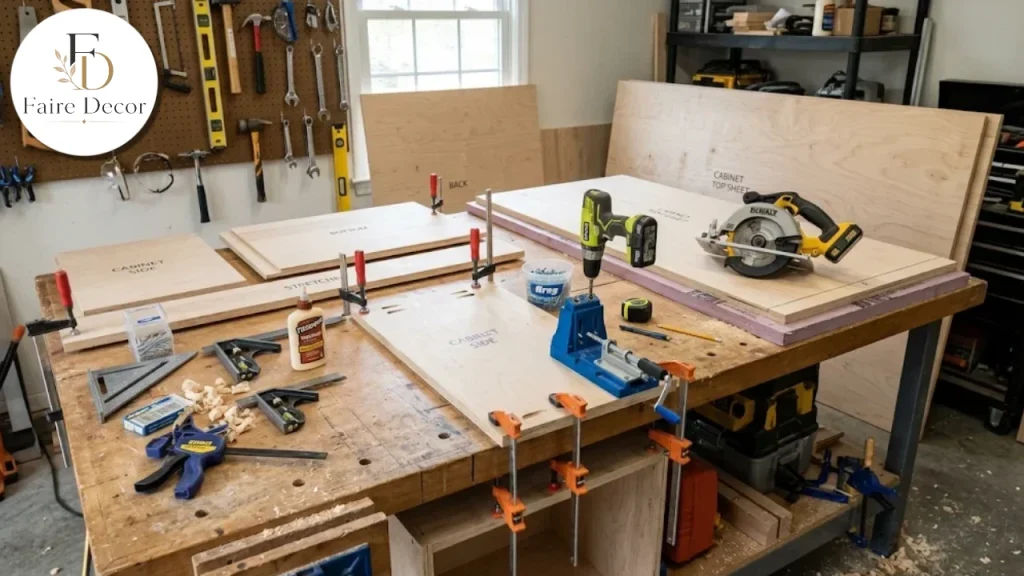
The same guide lists the tools below. You do not need all of them on day one, but you should know the full list before you commit.
Tape measure, speed square, and level
Drill and a pocket hole jig
Circular saw with rip and crosscut guides, and a jigsaw
Brad nailer and clamps
Palm sander and a palm router with a slot cutter
Edge banding iron and trimmers
Forstner bit for hinge holes
If you do not own most of these, buying them can add up. I have no sourced price, so tally your own list before you decide between building and buying.
A build order you can follow
Ana White’s guide runs in a clear order for kitchen cabinet plans. I have kept her sequence and added notes where I filled a gap myself. Her page skips a numbered step 2, so treat the order below as a working outline.
Design and cut list. Enter your dimensions into a design tool and print the cut list.
Cut the toe kicks. Cut the side panels with a jigsaw.
Band or frame. Band the front edges for frameless, or add 1×2 face frames.
Assemble the carcass. Join shelves to sides with 3/4-inch pocket holes and 1¼-inch screws. Keep fronts flush.
Add bay supports. Two at the top and two at the back.
Build drawers. Match the box sides to the slide length, and make the front and back 2½ inches shorter than the opening.
Make the doors. Shaker doors use 1×3 hardwood and 1/4-inch plywood panels.
Finish. Paint or stain before hanging doors.
Hang doors. Use concealed hinges.
The finishing step is easy to rush. Painting before you hang the doors is the order the guide gives, and it saves you from taping around hardware.
Drawer planning
Drawers are where a good plan earns its keep. Angi’s FAQ says drawer widths run 12 to 36 inches, matching the cabinet, with a depth of 24 inches and a height of 4 to 10 inches. A 4-inch drawer leaves a 30½-inch-tall cabinet below it.
Quik Cabinets lists a three-drawer base at 12 to 36 inches wide, with a 33-inch model at 33 by 34.5 by 24 inches. I have no sourced comparison of how much each layout holds.
When you plan drawers, check these.
Slide length matches the cabinet depth you chose.
Clearance works with the adjacent door swing.
Top drawer height suits the items you will store there.
Sinks, trash and special bases
Some base cabinets are made for one job. Quik Cabinets lists sink bases at 24 to 42 inches wide, a farmhouse sink base at 36 inches, a trash pull-out at 18 inches,s and a microwave base at 27 inches.
Plan these first, because they fix the plumbing and appliance positions. The rest of the run can flex around them.
For wall sections that must clear a window, a bridge cabinet can span above a range or sink. Quik Cabinets lists bridge cabinets at 12 to 39 inches wide and 12 to 24 inches high.
Finishes, doors, and the look
Plans cover more than boxes. The doors set the look, and that is where style comes in. Our guide to a coastal kitchen shows how paint and hardware shift the mood of the same cabinet layout.
If you are choosing a color, our post on gray-green paint is a useful read for a calm, natural palette. For the wider room, our home decor ideas that actually work have quick ways to pull the look together.
Flooring should be settled before the cabinets go in or at least planned alongside them. Our best flooring article covers the options, and our guide to how to decorate walls helps with the surfaces around the cabinets.
Budget and timing
I did not find a sourced figure for what cabinets cost or how long a build takes, so I will not give one. Here is how to build your own numbers instead.
Count your cabinets from the cut list.
Price sheet goods and hardware at a local supplier.
Add doors, drawer slides, and hinges per cabinet.
Add finishing supplies such as paint, stain,n and sandpaper.
Compare with quotes for stock or custom cabinets.
Compare the totals before you commit. If you are weighing a bigger project, our renovation tips article is a good place to think about where cabinets sit in the larger budget.
For a related cost breakdown, our shower renovation cost guide shows how we think about pricing a room project. If you are adding space as well, our havenlydiy home additions article covers a different scale of work.
Insulation, moisture,e and the room around the cabinets
Cabinets live in a working room, so the walls behind them matter. If you are opening up an exterior wall, our havenlydiy attic insulation article is a reminder to think about the whole envelope while the room is torn apart.
Our havenlydiy gray house post is a good example of how a neutral palette ties exterior and interior together. If you plan to sell, our guide on how to sell your home fast covers what buyers notice, and a clean, well-planned kitchen is high on that list.
For a modern touch, our smart home guide covers ways to plan for technology early, before walls are closed and cabinets are fixed.
Questions to ask a supplier or cabinet maker
Bring these to your first meeting. Write down the answers and compare them with the sources above.
Are your boxes face frame or frameless, and what is the carcass thickness?
What widths do you stock, and in what increments?
How much filler do you recommend at the walls and corners?
Are exposed sides finished, or do I need applied panels?
Which hinges and slides are included?
What is the lead time, and what does it include?
A kitchen cabinet plans checklist
Use this list as a final pass on your kitchen cabinet plans before you order or cut.
Room drawn to scale with every wall, window,ow and door
Fixed appliances and sink positions marked
Base height set at 34½ inches, with the countertop adding the rest
Gap between counter and uppers set, about 18 inches
Upper cabinet height matched to ceiling height
Filler allowances added at walls and corners
Face frame or frameless chosen
Cut list printed and checked against the sheet count
Hardware, slides, and hinges counted
Finish and color chosen before assembly
Mistakes to avoid
A few errors come up often, and each is easy to prevent with a plan.
Skipping the filler. Without a margin, the run will not fit a crooked wall.
Guessing appliance widths. Use the spec sheet.
Ordering before measuring twice. A re-order costs time.
Forgetting the ceiling. Uppers that stop short leave an awkward gap.
Painting after hanging doors. Follow the finishing order above.
Most of these come down to the same habit: check the drawing against the room before you spend anything.
Final thoughts on kitchen cabinet plans
Strong kitchen cabinet plans start with a scale drawing, use standard sizes where you can and leave room for fillers where you cannot. The sources agree on the core numbers and differ at the edges, so use the table as a starting point and confirm with your supplier.
Whether you buy stock boxes or build your own, the same steps apply: measure, choose a construction style, set heights and gaps, then build or order in a sensible sequence.
This article is general information, not professional design or construction advice. Confirm dimensions, local building rule,s and safety details with a qualified cabinet maker or contractor before you cut or buy.
FAQs:
What is the standard height of a base cabinet?
Bob Vila and Angi both give 34½ inches for the box. With a countertop, the finished height is about 35 to 36 inches.
How deep are standard kitchen cabinets?
Base cabinets are 24 inches deep as the standard. Wall cabinets are most commonly 12 inches deep, and tall cabinets are usually 24 inches.
How far should wall cabinets be above the countertop?
Bob Vila and Quik Cabinets both say about 18 inches. Bob Vila advises 24 inches or more over a range.
What is the difference between face frame and frameless cabinets?
A face frame cabinet has a solid wood frame across the front of the box. A frameless cabinet has no frame, and its plywood edges are covered with edge banding, according to CabinetNow, which sells both.
What material do I need to build cabinets myself?
Ana White’s guide uses 3/4-inch cabinet-grade plywood for the carcass and 1×2 trim for face frames, with an optional 1/4-inch plywood back.
Do I need filler strips?
Often yes. Quik Cabinets says cabinets come in 3-inch width steps, so filler strips of 3 to 6 inches are often needed, and advises 1½ to 3 inches of filler at each wall and corner.